-->
Showing posts with label Eating with season-Winter. Show all posts

Friday, December 25, 2020

Festive Greetings with Chicken Parcel Recipe and Choco Chip Cookies

 We are facing a very challenging pandemic year so far and each of us have their versions of challenges. However, festivals bring hope and happiness and we start anticipating nice things in progress, forgetting about the obstacles and challenges of a pandemic year.

Hope this Christmas lightens up your day with joy and laughter. Merry Christmas!!


I have made these Chicken parcels and dear daughter has made Choco chip cookies on Christmas eve yesterday, so likewise it has featured in the blog. These chicken parcels are easy to assemble with ready-made short crust pastry dough. These parcels reminded me of Cornish pasties, although not entirely similar but has uncanny resemblance, perhaps a little shape is lacking here and there. The crescent shape Pasty was replaced with a rectangular chicken parcel. I have avoided doing egg wash for each parcel. But next time will do that for a nice even shinny and crusty layer.

Now to the recipe

Chicken Parcel

Recipe requirements

  • Short crust pastry block- 500gms
  • 400-500 gms of chicken thigh portions
  • 1 medium size potato
  • 1 medium size onion
  • 1 cup of green peas
  • 100 Gms of baby chestnut mushrooms
  • 1 medium size tomato
  • 3-4 heaped tbs of chicken gravy granules
  • 1 tsp of black pepper powder
  • 3-4 tbs of cooking oil
  • 1 tsp of salt


Method

  • Clean and cut chicken thigh portions into bit size portions. Chop potato, tomato and onion. Cut potato into small bite size portions.
  • Now put a fry pan on medium heat. Add cooking oil, add in onions, baby chestnut mushrooms, green peas and cut tomatoes. Add in potato and chicken pieces as well.
  • Add in chicken gravy granules and salt. Add in black pepper powder. Add in a cup of water. Cover and cook for about 15-20 mints or till chicken turn out soft and the content starts collecting well somewhat more like semi-dry.

Now to the pastry

  • Take out pastry dough from the packet and divide it into 4 portions. Roll into a long rectangular slab. Please follow package direction for thawing and rolling the dough.
  • Divide the cooked chicken and potato mixture into 4 portions.
  • Place the mixture at one side and roll over from other side. Press with fork and seal the ends. (At this time, you can even do an egg wash for each parcel)
  • Preheat an oven at 180 deg C.
  • Put the parcels over baking tray and bake 25-30 mints depending on the make of oven. Take out once the sides of parcel start to brown out. The sides of the parcel should nicely toast and center should remain little bit soft but cooked well.
  • Serve warm and enjoy. Vegetarians can make it with soya chunks or Paneer pieces.

These Choco Chip Cookies were made by dear daughter and these turned out very delicious.


Choco Chip Cookies

Recipe requirements

Recipe adapted from (Here)

  • 125 gms of softened butter
  • 100 gms granulated sugar
  • 100 gms light brown sugar
  • 1 egg
  • 1 and ¾ cup of self-rising flour
  • 1 tsp of vanilla essence
  • ½ tsp of salt
  • 100 gms of chocolate chips

Method

  • Cream softened butter and granulated sugar, light brown sugar in a big mixing bowl.
  • Now add egg and vanilla essence and mix well.
  • Sift in self raising flour and salt. Keep mixing this flour mixture with creamed butter and sugar till all the dough starts to collect well. Dust off more flour if it gets sticky.
  • Put the dough to rest in fridge for about 2-3 hrs. Take out when you are ready to make Choco chip cookies.
  • Preheat an oven at 180 deg C. Line up a baking tray with grease proof paper or baking paper sheet.
  • Now make walnut size small balls out of the dough and roll them nicely rounded. Put them apart on baking tray. Sprinkle some chocolate chips over and gently press to secure them on cookies dough.
  • Bake in the oven for about 10-15 mints or the make of your oven.
  • Take out once sides are just starting to go light brown in color. Delicious Choco chip cookies are ready. Enjoy. This dough can be put in deep fridge and it will stay fresh for about a month, Use it accordingly.

May this Christmas bring you loads of happiness and laughter. 

Merry Christmas and a very Happy New Year everyone.

Friday, January 10, 2020

Paneer Makhana Ki Sabzi


Well, we are into a new year and I haven’t yet updated the blog. Let me wish a very happy new year everyone. May you have a happy, healthy, peaceful and joyous 2020.
A fresh start in to a new decade. It makes me pause for a moment to realize that 10 years have passed and in blink of a second, all memories keep flashing by. Well, each year was eventful and memorable and hope the same for you all.Once again- Happy New Year 


I will start this year on a very simple and homely food recipe of Paneer Makhana ki sabzi. As I understand after indulging in loads of sweets and desserts during holiday time, it’s time to go slow on sugar. Paneer a great alternative to chicken or meat can be cooked into a delicious curry.
This paneer makhana was served along with Gobi Aloo-matar -cauliflower potato green peas dry curry.
Now to the recipe
Paneer Makhana Ki sabzi
Recipe requirements
  • 250 Gms of paneer
  • 1 large cup of toasted lotus seeds/makhana in ghee
  • 2 medium size onions
  • 2-3 garlic cloves
  • ¼ inch ginger
  • 1 medium size tomato
  • 1 cup whole cashews
  • 2-3 green chilies

Seasonings
  • 1tsp of red pepper powder
  • 1 tsp of Kashmiri red pepper powder
  • 1 tsp of coriander powder
  •  ½ tsp of cumin powder
  • 1 tsp of garam masala
  •  1 tsp of cumin seeds
  • 1 tsp of Salt or as per taste
  • 2-3 tsp of ghee
  • ¼ cup of cooking oil


Method
  • Cut paneer block into cubes.
  • In a food processor or mixer/grinder, grind onions, garlic, ginger, tomato, quarter cup of cashews and green chilies in to a smooth paste.
  • In a fry pan, add in ghee about 2 tsp, fry the makhana or lotus seeds till they turn little puffy. Take out in a bowl.
  • Now heat up a heavy bottomed fry pan, add cooking oil. Add in cumin seeds. Let it splutter.
  • Add in the prepared paste, add in salt, turmeric powder, red pepper powder, Kashmiri red pepper powder, cumin powder and coriander powder and keep on stir/fry for 10-15 mints at medium high flame. Add in 2 cups of water. Preferably warm water.
  • Add in rest of whole cashews and makhana/ fried lotus seeds and of course paneer pieces.
  • Now cover the pan. Lower the flame and let it cook slowly for about 15-20 mints.
  • At the end add in ghee, garam masala and mix well. Add kasoori methi if you like it as a garnish. You can add green peas also.Serve and enjoy with rotis.


Happy Cooking Friends

Wednesday, December 25, 2019

Baked Puff Pastry with Cranberry Sauce


We are into last few days of December and today being Christmas gives me a reason to update the blog.
I have tried some recipes with puff pastry sheets, store bought though in past and they had been a hit with my family. Dear daughter even asks for a repeat of the recipe like this one, every festive season.
These puff pastry with cranberry sauce and topped with cream frosting was again well received at our dinner table. And this version is inspired by Brie and Cranberry puff pastry. I haven’t included brie cheese for this recipe though but still it’s very flavorful.


These looks pretty and with white cream frosting a very delicious combination. Now to the detailed recipe
Baked Puff pastry with Cranberry sauce
Recipe requirements
1 pack puff pastry sheet
½ cup of cranberry sauce
½ tsp of cinnamon powder
Some flour to roll the sheets
Method
Take out the puff pastry sheets and let it thaw for a while.
Then dust off with some flour and roll into a rectangular sheet. Just to even out the surface of the puff pastry sheet.
Cut the sheet into half. Now put cranberry sauce on both the sheets.
Sprinkle cinnamon powder.
Now from one end start rolling towards middle stopping at middle. From the other side start rolling and let it come in touch with the other rolled sides. The puff pastry sheet will look like a log at this stage.
Secure the two sides well with each other. Now cut these rolled puff pastry log sheets into ½ inch thick pieces. From each log at least 5-6 pieces will come out. The shape will be more of a mini palmier.
Now preheat an oven at 160 Deg C. Put them on a floured baking tray for about 15-20 mints or till they come out nice golden in color.
Take out and let it cool off.


Prepare cream frosting
½ cup of double cream
1/4  cup of icing sugar
2 tbs of milk
Method
Mix cream, icing sugar and milk and whip it to make small soft peaks.
Gently put this cream frosting over the cooled puff pastry pieces.
You can refrigerate for 1-2 hrs., before you start consuming them or you can enjoy straight away.
These are delicious as snacks as well.


Wishing everyone a very Merry Christmas and a Happy New Year. May the festive spirit linger on and creates cherished memories for you and yours. Enjoy and celebrate.

Thursday, December 12, 2019

Chicken Curry


Its December and we are very near to roll up another year. The last leaf bid adieu to gorgeous autumn, bare and naked trees slowly embracing cold winter season. Each cycle of season changes, invokes myriad feelings. 


All shops and market places are decked up and looks absolutely festive and colorful these days. 

We have put up a Christmas tree just like every year. And it has lighted up our home with joy and contentment. Festivals revive our bonding with friends and family also. Live, Laugh and Love 💟😊


So, enjoy festivity and take time offs. We have another week of schooling and then we will be having Christmas holidays. Holidays makes me busy, yes you read it right. We have to plan to fill in our days with some activities or even a movie day out. We are looking forward to Star-Wars movie this December, let’s hope it doesn’t turn out to be a let-down for us.


Zara hat key! This is what my daughter told me when she did her tasting for this chicken curry recipe. Although she can’t pinpoint exact spices that went into making this chicken curry, but she liked the final product. Meanwhile, I was trying to figure out, how should I name this recipe but nothing came to my mind. 

Without adding up any further mysteries, I thought let me just put it as ‘Zara hat key’. We liked this as a leisurely paced Sunday lunch with warm paneer pulao/pilaf as accompaniment. This is from our kitchen to your world, presenting Zara hat key chicken curry.


Chicken Curry- Zara Hat Key
Recipe requirements
  • Chicken – 1kg
  • 4 medium size onions
  • 4-5 garlic cloves
  • ½ inch ginger
  • 3-4 dry red pepper
  • 1 medium size tomato
  • 2-3 medium size potato cut into half

Seasonings
  • ½ tsp of red pepper powder
  • 1 tsp of Kashmiri red pepper powder
  • 2 tsp of coriander powder
  •  ½ tsp of cumin powder
  • ¼ tsp of carom seeds
  • 3-4 cloves
  • 2-3 green cardamom
  • 1 tsp of whole black pepper
  • 1 tsp of Salt or as per taste
  • 2-3 tsp of ghee
  • ¼ cup of cooking oil

Method
  • Wash and clean chicken pieces thoroughly. I have used chicken drumstick portions for this curry.
  • In a food processor or mixer/grinder, grind onions, garlic, ginger, tomato and dry red pepper in to a smooth paste. It would be better if you soak dry red peppers in warm water for about 1 hr or till they swell and become soft.
  • Now heat up a heavy bottomed fry pan, add cooking oil.
  • Add in the prepared paste, add in salt, turmeric powder, red pepper powder, Kashmiri red pepper powder, cumin powder and coriander powder and keep on stir/fry for 10-15 mints at medium high flame.
  • Meanwhile in a mortar/pestle, dry grind- carom seeds, cloves, cardamom, whole black pepper.
  • Now add in cut potatoes to the above fried masala paste. Add the dry masala powder that you have prepared earlier in mortar and pestle now.
  • Keep on stir/frying for about 8-10 mints more. Add in 2 cups of water. Preferably warm water.
  •  Now cover the pan and let it cook. Lower the flame and let it slowly cook in its own juices and all spices for about 30 -35 mints or till all the chicken pieces turns soft and cooked through well.
  • At the end add in ghee and mix well.


Happy Cooking Friends and Enjoy Festival Season 🙏

Monday, March 27, 2017

Lotus Root Curry - Kamalkakdi Ki Sabzi


I have never made lotus root curry or ‘Kamalkakdi ki sabzi’ until that day. I was going through the vegetable aisle of our grocery stores here and came across these fresh lotus roots. I got intrigued and purchased it, thinking that I will make a semi-dry curry out of it. Now here in Malaysia, lotus root is extensively eaten in soups and noodles stir /fry preparations. In UP, India, it is known most commonly as ‘Kamalkakdi’ and Kamalkakdi ki sabzi is a staple food in cold winter months. You can even make a simple stir/fry preparation with cumin seeds and dried red chilly. Lotus roots are great source of dietary fibres, they are bit crunchy and has a delicate flavour. It is also known as ‘Renkon’ in Japan and ‘Lian Ou’ in Chinese. ‘Renkon’ Chips are very popular snack in Japan. Young Rhizomes are added to salad but more mature rhizomes needs proper cooking. Lotus root should be cleaned thoroughly of mud in water.


Here is how we made Kamalkakdi ki sabzi/or Lotus root curry.

Lotus Root curry (Kamalkakdi ki sabzi)

Recipe requirements
  • 1-2 whole lotus roots – approx. 400gm
  •  2 medium size potatoes
  • 5 fat cloves of garlic
  •  2 medium size onion
  • ½ inch ginger root
  • 1 large size tomato

For tempering and seasonings
  • 1 tsp of turmeric powder
  •  2 tsp of red pepper powder
  •  1 and half tsp of coriander powder
  • ½ tsp of cumin powder
  •  1 tsp of salt or as per taste
  • ¼ tsp of sugar
  • 3-4 dry red chillies
  • 1 tsp of cumin seeds
  • 5-6 tbs of mustard oil
  • 1 tsp of ghee
  • 1 tsp of garam masala

Method
  • Clean lotus roots properly in water. Peel the outer skin and slice them in rounds of about ¼ inch thick pieces. Leave them for a while in water and then clean it thoroughly with water again.
  • Put a big pot with ample water to boil. Add salt and the lotus root slices and cook them for about 15-20 mints. Or alternately you can pressure cook them for two whistles.
  • Heat up a fry pan, add 4 tbs of mustard oil, and add in cumin seeds, dry red chillies.
  • Now add in finely chopped onion, ginger, tomato and chopped garlic into it.
  • Keep on stir/fry for about 7-8 mints at medium high flame.
  • Now add in turmeric powder, red pepper powder, coriander powder, cumin powder and salt. Add in sugar as well. Sprinkle little bit of water and keep on stir/fry.
  • Take this fried masala out and pulse through a grinder to get a smooth ‘masala paste’.
  • Add in about 2 tbs of mustard oil in a fry pan.
  • Add in potatoes pieces preferably c ubed. Fry the potato pieces evenly. Take them out.
  • Now add in the above prepared ‘masala paste’
  • Add in chopped/sliced lotus root  and fried potato pieces now. Mix lotus root pieces very well with spices.
  • Add in 2 cups of water. Cover and cook for 15-20 mints at med-low flame or till the lotus root pieces are cooked well.
  • Add in ghee and garam masala at the end. Give a final mix.
  • Take out and serve in a bowl with rotis or rice whatever way you prefer eating.


Happy Cooking Friends and you all have great week ahead.

Monday, February 20, 2017

Cabbage with Shrimp stir/fry - Chingri diye Bandhakopi - চিংড়ি দিয়ে বাঁধাকপি


I don’t need to write about the benefits of green leafy-vegetables. So I will skip that part and also I don’t want to sound boring and rhetoric to you all. Cabbage with shrimps, now who doesn’t like shrimps except few of us, who have allergies. This is a very homely Bengali way of making cabbage with shrimps. People may have little variations to it, like some may use cumin seeds for tempering, some may not, and many will go on to add grounded ginger+ cumin as the base of the masala. Please use ingredients, whatever way you want to make.


This is how this recipe is made in our kitchen.

Chingri diye Bandhakopi – Cabbage with shrimp stir/fry recipe

Recipe requirements
  • 1 whole cabbage – approx. 400gm
  •  De-veined shrimps- 300- 400 Gms
  • 2-3 fat cloves of garlic
  •  1 medium size onion
  • 2 medium size tomato


For tempering and seasonings
  • 1 tsp of turmeric powder (½ tsp of stir/fry and ½ tsp for rubbing on shrimps)
  •  2 tsp of red pepper powder
  •  1 tsp of coriander powder
  •  1 tsp of salt or as per taste
  • ¼ tsp of sugar
  • 3-4 dry red chillies
  • 1 tsp of panch phoron
  • 5-6 tbs of mustard oil
  • 2 tsp of ghee
  • 1 tsp of garam masala

Method
  • Chop green cabbage finely.
  • Clean, de-shell and devein Shrimps. Rub in shrimps with turmeric powder and salt.Keep aside.
  • Heat up a fry pan, add 2 tbs of mustard oil, add in shrimps and stir/fry them for about 2-3 mints and take out in bowl.
  • In that fry pan itself, add more mustard oil, temper it with panch phoron, dry red chillies.
  • Now add in tomato and chopped garlic into it. Add in chopped onions.
  • Keep on stir/fry for about 5-6 mints at medium high flame.
  • Now add in turmeric powder, red pepper powder, coriander powder and salt.Add in sugar as well. Sprinkle little bit of water and keep on stir/fry.
  • Add in chopped cabbage now. Mix cabbage very well with spices.
  • Add in quarter cup of water.Cover and cook for 7-8 mints or till cabbage leaves are cooked through well.Add in fried shrimps now, stir/fry and mix with a spatula for another 3-4 mints.
  • Add in ghee and garam masala at the end. Give a final mix.
  • Take out and serve in a bowl.


Note-

You can add chopped potatoes and green peas as well.

Happy Cooking Friends

Sunday, January 15, 2017

Ranga Aloor Pantua- রাঙ্গা আলুর পান্তুয়া and Happy Makar Sankranti


A new year 2017 and I am here, with my first blog post of the year. Hope you all had fantastic New Year celebrations.
We visited our home city Kolkata during these holiday break. And that requires a separate post I reserve for some other day.


I will share a dessert recipe to start off New Year blog post-‘ Ranga aloor pantua ‘- sweet potato dessert, is one such traditional Bengali sweet recipe. I have blogged about the recipe way back in past as well. Here- back in 2009 . This post is however a recipe which is re-visited and with couple of additions. 
This recipe is simple, as it doesn’t have coconut stuffing which makes it similar to ‘Ranga Aloor Pithe’. Since we are observing ‘Poush-Parbon’ these couple of days, I thought it would be appropriate to write about Ranga Aloor Pantua- pantua as like Gulab Jamuns in Hindi.


Sankranti celebration is a big affair in every Bengali home- some, even extending it to 3 –days celebrations. Each day is marked with various types of Puley/pithe being made. I have blogged many recipes for Sankranti …
This archived blog-post has all those traditional recipes which one can make during these period.
To the recipe

Ranga Aloor Pantua- Sweet Potato Gulab Jamun- রাঙ্গা  আলুর পান্তুয়া 

Recipe requirements

10-12 purple sweet potato
¼ cup of plain flour
2 pinch of baking soda
1 and ½ tsp of cinnamon powder
3 cups of granulated sugar
2 cups of water
½ tsp of cardamom powder
Cooking oil for deep fry 
Method

  • Put a large saucepan with water and sugar on cooking.Add in cardamom powder. The water content should be reduced to half and the syrup will be slightly thick like to coat well the pantuas = gulab Jamuns.
  • Now pressure cook sweet potatoes. Take out , peel off the skin and let it cool a bit , so that you can work it through but don’t let it go cold otherwise it will be hard to mash up well.It would be nice if the mixture is lump free and smooth.
  • Now in a big mixing bowl, take the sweet potato pulp/mash, add in cinnamon powder.
  • Now mix in plain flour and pinches of baking soda, add flour to above mashed sweet potatoes, mixing in very well. Make small balls out of the dough.Be gentle in shaping these balls.
  • Put a heavy bottomed pan/kadai or deep frying pan to flames. Add in cooking oil, enough to deep fry these cute small balls.
  • Deep fry them for about 5-7 mints at medium-low flames or till they turn into nice brown in colour. Do not hurry this process otherwise they won’t cook well.
  • Transfer them all over kitchen towels, so that they absorb extra oil.
  • Now dunk them in sugar syrup and let the sugar syrup simmer slowly at low flame for couple of more minutes. Switch off the flame and cover.


Let it rest for about an hour. Serve and enjoy these delicious pantuas.

Some more Sankranti recipes

Till and Badam ki Mithai

Choshir payesh-on-sankranti

Dudh- Puli pithe


Again wish you all a very Happy  Makar Sankranti, Lohri, Pongal and Bihu.

Happy Cooking 

Thursday, December 15, 2016

Of This and That - Some Musings


This will be my last post for 2016… It’s raining heavily outside, sitting down with my laptop on our dining table, occasionally I glance through my balcony doors to look far ahead, but the visibility is zero. I made a glass of chilled iced lemon tea for myself...Music playing in the back ground, you know those ageless and soul-soothing old Hindi songs – like one from film ‘Anupama’. December makes me feel cold inside, although the temperatures outside will defy all things winter has to offer here. There is nothing as such a typical ‘winter’ in Malaysia – rain and sun-shine all through the year. How I longed for the coldness, winter has to offer and the white snow clad houses and streets, is a forlorn story here.


But even in those scarcity of true feelings for winter, we created a space in our heart which made us believe, yes believe, that these last few days of 2016, this festive spirit will linger on. We have put up a Christmas tree just like we used to do in UK. 


Warming up our cold hearts, this tree reminded us to believe in everything about life- whatever the challenges, obstacles one may face, believe in yourself – this will pass through. We have made it so far, hopefully we will keep doing so in future as well. In all those challenges, we should not forget about all the blessings which god has bestowed us all. Pause for a moment, take out time from your busy schedules and please count all those blessings. The true spirit of festivals lies there.


The shopping malls are all decked up and busy here with beautiful Christmas decorations and huge Christmas trees and people shopping for their near and dear ones. We usually sit down on those numerous benches inside shopping malls and watch the world go by leisurely. 


There will be people shopping on the likes of Gucci/Prada/MK / Miss Selfridge/ Topshop/Zara and what not, in those numerous shopping malls, during these last few days before Christmas. But to me Christmas, or for that matter any festival, is all about togetherness of family and friends. Gifts are just add-on like cherry on top of an assembled black-forest cake.

Couple of days back, we had a long weekend, so, dear daughter called up her few friends from our residential-complex and had a mini-Christmas snack party. 


The home was filled with the warmth of their girlie-chat, laughter and fun. Time flies and even before I realize, these girls all in pre-teen age are ready to create their own stories, just like we did decades ago.


Since these are holiday time, I thought instead of doing a recipe post, a proper menu post will be more helpful.
The snack- menu had chocolate cupcakes, cucumber and mozzarella cheese sandwich, baked chicken drumsticks and roasted spiced potato wedges with plenty of cold drinks.
There was another platter which we had on Sunday - roasted potato and orange sweet potato, tofu fried rice, baked spicy salmon steak and California rolls (this one is a type of  'Sushi'- store-brought though)…And there was plenty of litchi mock tail as refreshments.


Recipe for Oven- Baked Salmon Steak
Requirements
Salmon steak pieces- 4-5
Spices
½ tsp of turmeric powder
2 tsp of red pepper powder
 2 tsp of coriander powder
1 tsp of cumin powder
½ tsp of cardamom powder
½ tsp of cinnamon powder
 1 tsp of black pepper powder
Salt as per taste
Method
Take all the spices in a big bowl and mix in well.
Now rub spices all over the salmon steak pieces.
Cover and keep it in fridge for about half an hour.
Now preheat an oven at 175 deg C.
Place the salmon steak pieces over a baking tray and put that in the middle rack.
Bake for 30-35 mints. Take out serve hot. These are absolutely delicious.

Roasted spiced potato wedges have the same spices as listed above. The only addition was mustard oil and chili flakes to marinate them well.Bake the potato wedges at 180 Deg C for 40 mints.

Cucumber Mozzarella sandwich- Layer thinly sliced cucumber over buttered sandwich bread and then top it up with grated fresh mozzarella cheese or cheese slices. Press the sandwich and viola ready in jiffy.You can use tomato as well.Tomato and Mozzarella is another great combination.

Tofu Fried Rice
Requirements
 3-4 cups of cooked rice- for 3-4 people
you can use brown rice as well
 200 Gms of extra firm tofu
2 tsp of thick soya sauce
1 tsp of oyster sauce
1 tsp of red pepper powder
1 tsp of black pepper powder
 3 tsp of grated fresh ginger
 1 stick lemon grass
 3-4 tsp of soybean oil/ or sesame oil
Method
In a big wok/fry pan, add in oil. Add in firm tofu pieces and fry them at high heat for about 3-4 mints.
Take out and keep in a separate plate.
Add in grated ginger, cut lemon grass  and any vegetables you would like to add- I have used carrots and tomato finely chopped. Toss well and cook at high heat for 3-4 mints.
Add in all the sauces and spices listed above. Adjust salt.
Add in fried tofu and coat well with spices and sauces.
Now add in cooked rice and mix well. Serve and enjoy.

These recipes can be found in archived posts here…

You all have a great festive time.


Happy Holidays, Merry Christmas and have a Happy new year …….

See you all in new year 2017…Welcome 2017....bye –bye 2016…..

Friday, December 9, 2016

Fettuccini with Tofu and Vegetables


It’s December and this means an entire year is wrapping up soon. In 2016, we re-located to Malaysia and which meant whole lot of adjustments. New school and friends for dear daughter and us trying to get a grip of new place. Leaving behind the familiarity of everything in UK and starting all over fresh again, is never an easy task. But so far so good, and yes, it has been a great learning for us. We have slowly started enjoying our weekend outings and this brings us to understand the cultural differences we have over here. In spite of being in the centre of constant changes, we have managed to make few friends over here.
All I can say, a year has made me realize that nothing in this world is permanent, people will come to our lives, impacting us, teaching us valuable things about life and then leave, leaving behind their memories. Life itself is a collage of all great memories- Experience it and treasure it.


I had fettuccini pasta, and thought of using it up with tofu and other vegetables. We like to add lots of veggies to our pasta dishes which gives nice colours and texture.  This can also be made ahead and can be served as cold salad.
Now to the recipe

 Fettuccini with tofu and vegetables 

Recipe requirements
400 gms of Fettuccini pasta
 400 gms of extra firm tofu
Vegetables of your choice
Carrots
Onions
Tomato
 2-3 tbs of pasta sauce
4 tbs of butter
¼ cup of sour cream
 ¼ cup of parmesan cheese
Salt as per taste
Black pepper as per taste


Method

Take a large pot with ample water. Add in salt to it. Let it come to one boil. Add in dried fettuccini and cook al dente (cooked but still firm).
In a separate fry pan, big enough to hold all the pasta and with vegetables. Add in butter, let it melt and then add chopped vegetables- like onion, carrots and tomato. Add in tofu pieces. Add in pasta sauce.
Stir/fry all for about 4-5 mints. Add in cooked fettuccini with the cooking water. Add in parmesan cheese and sour cream. Mix all the ingredients very well and coat well with sauce. Adjust salt and seasonings- black pepper etc.

Sprinkle some chilli flakes and enjoy.

Happy Cooking Friends and have lovely weekend

Friday, December 2, 2016

No- Bake Chocolate and Lemon cheesecake


I was never a fan of classical orchestra music, but don’t know what happens with Hans Zimmer, and I do really like what he creates- these past couple of days I have been listening to his masterpieces- and one is the sound-track of Inception- Time. The tune is so haunting and keeps lingering on. It gives you motivation and sadness at the same time. Another one is ‘A Way of life’. Those are real masterpieces. Any way music is to soul and so is the food. There are many soul satisfying foods as well.


We were carving for some cheesecake and my daughter was asking for a cheesecake for a long time. I was having some left-over crumbs from this recipe of – Chocolate mice, so wanted to use it and it ended up as the crust of the no-bake cheesecake. The slight hint of lemon was also an added bonus. So, the no bake cheesecake with lemon and chocolate flavour was born. The end product was very appetising and soul satisfying just like music by Hans Zimmer.
Now to the recipe

No-bake chocolate and lemon cheesecake

Recipe requirements
For the top

  • 1 and half cup of mascarpone cheese
  • 1 and half cup of cream cheese
  • ½ can of condensed milk (optional)
  • Roughly about 3-4 tbs of lemon juice
  • ½ cup of chocolate powder
  • For the base/crust
  • 5-6 tbs of butter at room temperature
  •  20-25 Chocolate biscuits -
Method
Crush chocolate biscuits in a mixer or you can use rolling pin as well. I have used oats and chocolate biscuit for this recipe (available here as Oats crunch biscuits). You can use crackers as well. The crust was delicious with chocolate flavour and sweet.
Now in a big mixing bowl, mix together biscuits crumbs and butter with your hands. The mixture will be like a moist crumbs.
Take a  round 9'' inch cake tin and put the mixture in to it and press gently to make it firm. This will be the base/crust of no-bake cheesecake.
In a separate mixing bowl mix in mascarpone cheese, cream cheese and condensed milk with lemon juice and about 1 tsp of fresh lemon zest. (You can skip condensed milk if you wish but then you have to increase the cream cheese and mascarpone content and also will have to add castor sugar to make it sweet.)
Now pour this mixture over the base. Tap the corner of the cake tin so that it evens out.
Now sprinkle chocolate powder all over it.I have used Caotina drinking chocolate powder. You can use any other brands as well. But for me it’s Caotina for sure.

Refrigerate the cheesecake overnight. Serve it next day.
Tip- You can use Oreo biscuits as crust as well.

Happy Cooking Friends and have a relaxing weekend

Wednesday, June 1, 2016

Cherry Banana Dates Cake


Last time I made cake, perhaps it was in UK. I have mentioned in my last blog-post, we have moved into a new country- Malaysia, it is rather enigmatic, but full of all the beautiful possibilities for me. Things which were once familiar to us in UK, have become almost on a verge of extinction for me. When I first thought of about this cake, fresh cherries were on my mind. And ripened juicy cherries are so abundant in UK, that god knows how many times I have bought them and made cherry cake umpteen times also. 


Now comes the challenge, new kitchen, unfamiliar oven, and here I am again struggling with basic cooking instructions. Add to top of that, I didn’t get fresh cherries here as well. I happened to pick glazed cherries packets on my last grocery shopping rounds here. I kept pressing all the oven buttons desperately, perhaps wrongly, even oven timer wasn’t following my advice. And as I huffed and puffed, stream of sweat started flowing down my cheeks, and I started feeling anxious. And as I was about to make a frantic call to our landlady, the oven on its own decided well, yes it’s time to rise and shine. Phew! The day was saved and the cake was made, as if I conquered that lost Treasure Island. My gold and my platinum was, seeing this cake beaming out of hot oven- fresh and moist, ‘ Cherry Banana Dates cake ‘, as if an oasis has opened up right in front of me and that enigmatic mirage just vanished out of my sight. One worry off my shoulder now!

Here how I made this cake.
Cherry Banana Dates Cake
Recipe requirements
 1 and ¾ cup of self-rising flour
¼ tsp of baking soda
¼ tsp of baking powder
 2tsp of vanilla essence
2 eggs
½ cup of fine granulated sugar
 2 fully ripened bananas
 ¼ cup of plain yogurt
 ¼ cup of melted butter
½ cup of chopped fresh cherries or glazed cherries (whichever is available)
½ cup of chopped dates


Method
In a big mixing bowl. Sift self-rising flour, add in baking soda and baking powder. Mix well.
Now in a separate bowl, cream together butter and sugar well. Add in eggs, one at a time and whisk in gently. Now add in vanilla essence.
Add in ripened banana and mash them properly, keep on mixing all .Add in plain yogurt and gently fold in. Add in chopped glazed cherries and chopped dates. If you can get fresh cherries, you can use them.
Now add the flour mixture from time to time to make the cake batter. Use up all flour mixture to mix in with the above mixture.
Preheat oven at 175 deg C.
Prepare the cake tin. Brush butter evenly and then sprinkle flour to coat it well. Tap the cake tin so that the flour gets distributed evenly.
Pour the cake batter in to the prepared cake tin. Bake the cake in the middle rack for about 30-35 mints or till the centre of the cake is cooked through well. Check by inserting a toothpick, if it comes out clean, cake is baked well.

Take out the cake and let it cool. You can make frosting if you wish to, otherwise the cake is moist on its own.

Happy Cooking 

Friday, March 6, 2015

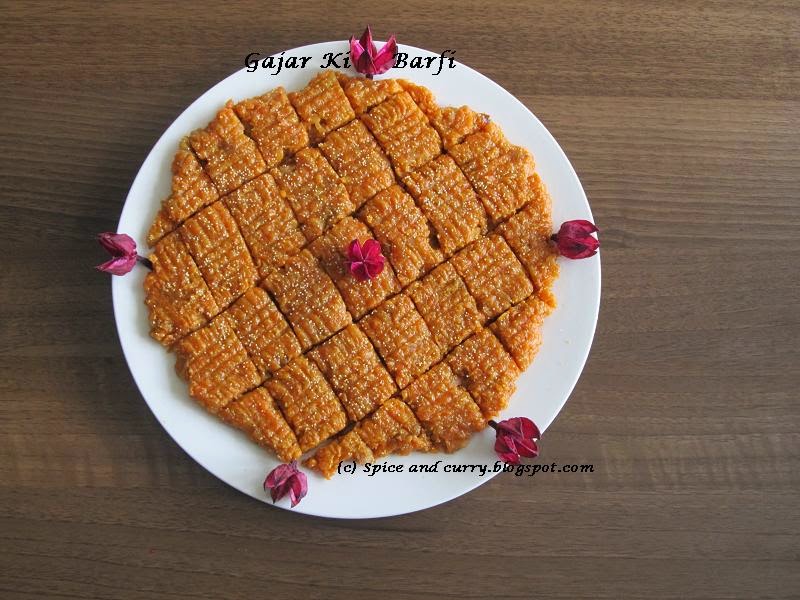
Gajar Ki Barfi - a Sweet Recipe with carrots and Happy Holi

It looks like I haven’t updated the blog for a long time. But then today is a special day also, being Holi , a recipe post is compulsory, isn’t.Ok, but before I jump to write the recipe.First,Wish you all a very happy Holi, may the festival of color brightens your life with hope, happiness and prosperity.
As of now, I have some sweets for you all, gajar ki barfi. Carrrots are cooked, with ghee, dry fruits and khoya and then the end product is, you all know how sweets are.Ek baar khao to khate he raho!!


Now to the recipe for gajar ki barfi ….
Gajar ki barfi- A sweet recipe with carrots
Recipe requirements
  •  4-5 medium size carrots- make 3 cups of grated carrots roughly
  •  1 cup of whole milk
  • ½ tsp of cardamom powder
  •  Half a tin of condensed milk
  •  3-4 tbs of plain flour
  • ¼ cup of white poppy seeds
  •  ½ cup of sugar or as per taste
  • 1 cup of ghee or melted butter
  •  1cup of chopped cashews+walnuts

Method
  • Wash and clean carrots, grate them with a steel grater /shredder.
  • Put a pan on heat, add milk and put the shredded carrots. Let the milk completely dry up. Keep on stir/fry so that it doesn’t stick to the bottom. Cooking is done at medium flame.
  • Now add in chopped and toasted cashews and walnuts pieces. Add in cardamom powder as well.
  • In a separate pan, add in butter about 1-2 tbs, and stir/fry the white poppy seeds for about 5-6 mints or till they barely change into light brown in colour.
  • When the milk has dried up, add in melted butter or ghee. Allow the time to mix ghee and carrots well.
  • Add in condensed milk and keep on stir/fry at medium flame for about 10-12 mints. At this stage the mixture will be runny due to the addition of condensed milk. Allow the milk to dry up.
  • Now, add in stir/fried white poppy seeds to the mixture. Keep on stir/fry so that it doesn’t get stick to the base. Add in plain flour. Once you add in plain flour the mixture will start, collecting well. I have used condensed milk+ plain flour in place of khoya (plain flour acts as a good binder to the mixture).If you get or make fresh khoya, and then you can use it as well. Just wanted to add, khoya is also known as mawa in Hindi, and kheer in Bengali.
  • When the mixture has started to collect well, leaving the sides of the pan easily, stop cooking it further.
  • Now grease a plate with some ghee, and scoop out the mixture over it. With the help of a spoon, flatten the carrot mixture evenly. Allow it to cool. Once it gets cooled, cut it into square barfi.Gajar ki barfi is ready.
  • Sprinkle some toasted white poppy seeds all over. They are soft in texture, unlike the usual commercialized other barfi that we get.
  • Store in fridge and consume within 3-4 days.


And Have a Very Happy Holi 

Wednesday, January 14, 2015

Choshi'r Payesh on Sankranti

The earth rotations evokes season, and with each passing season comes, the festivals that are particularly associated with that season. Winter, although proclaimed to be rather cold, kind of a villain in a film, but even then, there are many festivals, specific of these seasons which prepare us for celebrations. Last year in December we celebrated Christmas. Now it’s Lohri/Makar Sankranti/Pongal/Poush Parbon, actually these all are quite similar functions but with different names particularly region specific in India.
Wish you all a very happy Makar Sankranti, Poush Parbon, Lohri, and Pongal.


Being raised in a traditional family, those never-ending get-togethers, party and festivals, always sounded like a “Mela” to me. Every season has various festivals, and each festival was integral part of our family culture, even including Christmas. And once the New Year ushers in, it was soon time for “poush- parbon”, as in a typical, middle-class, joint Bengali family. Three days were important, every corner of the house was mopped and cleaned and then it was the usual routine of making various Pitha and pulley in our family kitchen. This goes same with my husband’s family. Although it was more rigorous, as it was so specific of Kolkata culture. For us probashi, it was lenient, in terms of cooking pitha or pulley.
My Ma-in-law observes Sankranti for two-three days. Each day a new type of pithey or pulley should be made, like- shoro Chakhali, ranga aloor pithey, Sedho pulley-pitha etc and must is nolen gur’er payesh.I have listed few Sankranti recipes over here.And Sankranti celebrations in my in-laws native’s place without nolen gur’er payesh, is incomplete. Now, My Ma who has  mix of both the world, I mean UP culture and Bengali culture, she makes Sankranti Khichuri and also one of the various pithey only on Sankranti day. For her, a Sankranti celebration is incomplete if she doesn’t make “Sankranti Niramish Khichuri” and “pati shapta”.
Today, I thought of sharing a long forgotten recipe, Choshi’r payesh.As it seems to me now with a vague memory, I can’t recall when was the last time I ate it, so forget about making it in my kitchen. Then I searched in internet, it added to my further disappointment.So, to be honest this is my first attempt of making choshi/chushi.As I can’t recollect the method, I called back home to ask my Ma to guide me with her recipe, while she was telling me about two possible way of making this. One was with atap chal/rice flour and other with khoya+maida.How ever, she is keen on making the choshi with khoya+maida, as it tastes more flavourful.
She herself has seen her grandmother – making “Choshi”- chushi, all from scratch, which obviously is a tedious process, as in those days, there was nothing called commercialization aspects of recipes. So, every home used to make home made rice flour or even making or shaping choshi with their hands. Once the Choshi were shaped and made, then it used to sun-dry. Once the choshi were sun-dried properly, on Sankranti eve or on one of the days during Poush Parbon, they would make Choshi’r payesh.Usually, it was first fried in ghee and when the milk has thickened with sugar or “nolen gur”, the choshi were slowly added to the simmering milk/kheer, finishing off with sprinkling crushed cardamom powder.My Ma has a very melodious and lyrical way of describing the act when the “choshi” should be added to the thickened milk in case it’s made with rice flour as once they are added , it tends to go soggy or fall apart in milk.Put the flame to med-high when you are about to add choshi   and ‘jokhon dudh ta “tog-bog” korey phute uthbe, tokhon chushi ke ashte korey dudh e chere dite hobe,anch ta bondo korey, er por chapa diye rakhte hobe.” (Ok I don’t need to translate that.)
That was a long process, and time –consuming affair. These days, when I don’t have much time on my hand, like many of you, I would suggest make it with “ready-made choshi” which are now easily available in various grocery stores in Kolkata during these Poush- parbon days. And in case you don’t have access to ready-made choshi, then read ahead and try to make it in your home kitchen. If a novice like me can do it, so you can.
Since I have made it with Milk powder+maida, I will just put a note about the Rice flour choshi pithey.All the process of making choshi pithey remains the same except just not making it with rice flour.

Note about Rice flour Chushi Pithey

Take about half cup of rice flour and knead it with lukewarm milk. After the dough has started to collect well, it will be soft to touch. Now divide in two portions. Roll each portion with the help of your palm and shape it like choshi. After the milk has thickened, add in sugar or nolen gur if using it. Let it dissolve completely. Fry the choshi in ghee, just barely to give them a nice golden colour at low flame. Add them in the thickened milk, cover and let it simmer for few minutes. Switch off, and let it cool.


Now to the method which we have made- (My Mother’s recipe)
Choshi’r payesh
Recipe requirements
For the choshi 
  • ¾ cup of milk powder
  • ¼ cup of maida/ flour
  • Or 1 cup of khoya+4-5 tbs of maida
  • 800 ml or  2 ½ -3 cups of whole milk roughly
  •  3-4 crushed cardamoms
  • 5-6 tbs of sugar or to taste or Nolen Gur as per taste
  • 3-4 tsp of ghee

Method
Chushi making and shaping
  • In a mixing bowl, mix in milk powder+ maida. Knead them well, with lukewarm water. Or you may use Khoya if you can get it fresh as that is what my mother uses it.
  • Now after it starts collecting well, divide the dough in to small portions. With clean hands, roll each portion in to a long rope, use some flour if the dough is sticky.
  • Each rope can then further be divided into portions. Roll each portions in to the shapes as depicted in the “how to shape picture”. Now usually at this time the Choshi is roughly 5-6 cm. You can go ahead and make it with this much long choshi. As you can see, I have further reduced the length to roughly 2 cm.Now put them to air dry for about an hour.Unused dough freezes well, and in case you want to fry them all, do so and store in fridge, consume within 2-3 days.Ok to be precise, if you can shape  like "Orzo pasta shape"  then that is nearly perfect.
  • Make other choshi similarly. Do not hurry, take time to roll the choshi, and shape them with gentle hands. The smaller they are chances are they won’t break in the thickened milk.

Now to making  payesh with Choshi
  • Meanwhile you are making choshi, put the milk on heat, Crush cardamoms, and add in to the simmering milk. When the milk has reduced (which at least require 30-35 mints at med-low flame, and stirring in between ), add in sugar.You can also add in nolen Gur, which gives that rustic touch to Choshi’r payesh.And I don’t need to write about the flavor.
  • Put a fry pan on heat; add in ghee/oil. Now fry the choshi on low flame, just barely giving them a nice golden to brown colour.We require about ¾  cup of choshi or two handfuls of home-made choshi.
  • When the sugar has completely dissolved, the milk tends to get thinner, even though it already has thickened earlier. Don’t fret; continue simmering another 10-15 mints. You will see the milk starts thickening again. At this point add in the fried Choshi to the thickened milk. Few minutes of cooking and stop cooking it further. Let it cool.
  • Refrigerate once it gets cooled; consume within 2-3 days. Enjoy the choshi’r payesh.

This is absolutely divine in taste, and if you can make it with nolen gur, I really don’t think, I need to write further.


Note-

Choshi’r payesh -the recipe above is how our home makes it, I don’t claim it to be traditional, as the traditional process is time consuming. If you are making choshi pithey payesh, then make it with rice flour. Although personally I will prefer the taste of choshi payesh, if choshi is made with khoya or milk powder.

Happy Cooking and have a  Happy Sankranti and Poush Parbon.....