-->
Showing posts with label Milk Produce. Show all posts

Tuesday, March 10, 2020

Malpoas and Happy Holi


Festivals invokes nostalgia and memories. Holi/Doul Poornima was much awaited in our home. While growing up, I liked the dry colors or ‘Phag’ in Hindi, as Holi falls under Phagun month according to Hindu calendar. I was never a fan of wet Holi and in secondary school, I almost stopped playing with colours. Don’t take me wrong, I like colors, in fact I adore colors, but when it comes to playing with wet colors, I shy away. Anyways, I always liked Phag and those varied colors of phag sold in small packets- red, yellow, green and orange. When splashed in to the air, smell of Phag intoxicated many minds and souls. Those days phag used to have a sweet aroma, or may be my olfactory nerves were much active then. I could smell that beautiful aroma of Phag.One whiff and the entire mind used to get intoxicated with joy and happiness that surrounded those celebrations on every Holi Mornings.
As the day progressed, I would peek inside kitchen to see what is being cooked there. My mother used to make Gujia, namkeen, Dahi vada etc. on every Holi. Sometimes, I would see her make these ‘Bhaja Malpoas’ as well. I also recalled, once we went to meet up our school teacher in the evening. I was in junior school at that time. I would call her madam A, as she reminds me of a famous Hindi poetess. Both share same name. Madam A, was earnestly making fresh batches of ‘bhaja malpoas’ for her school kids and was serving them warm as well. Those days teacher-student relationships were very cordial and they were almost like our guardians. The joy and satisfaction on my mother’s face and my teacher Madam A’s face is incomparable. These ladies have different aura about themselves.


I have tried to re-create those same ‘bhaja malpoas’ in my kitchen as well. I don’t know if this is something to preserve traditions, or remembering and acknowledging my mother’s and Madam A’s contributions in shaping my future and developing memories, but I like to make them once in a while during festivals.
These Bhaja Malpoas makes me feel the comfort of that bygone era. Festivals indeed invokes feelings and nostalgia. Before I jump to recipe, Wishing everyone a very Happy Holi, Doul Poornima.
This is how I made Bhaja Malpoas.

Bhaja Malpoa/ Mini fried pancake
Recipe requirements
  • 1 cup of self-rising flour/Maida
  • 1 cup of roasted semolina/Sooji
  • ¼ cup of sugar
  • 3-4 tsp of fennel seeds
  • 1 cup of milk or as required to make the batter
  • 2 cups of cooking oil
  •  2-3 saffron strands (optional)


Method
  • In a big mixing bowl, mix in semolina and self-rising flour. The proportions, I generally take equal in quantity.1:1 for semolina and self-rising flour. If you don’t get self-rising flour, use plain flour but add in about a tsp of baking powder.
  • In a mortal and pestle, coarsely crush fennel seeds.
  • Now add in fennel seeds and sugar to the above. Add whole milk slowly and mixing through, make sure there are no lumps.Add saffron strands if you wish to add.
  •  Make a smooth batter not too thick and not too thin, just like a pancake batter, easy to drop in consistency.
  • Now in a deep bottomed pan, add in cooking oil. Let it heat up.
  • Take about a heaped table spoon of the batter and slowly drop into the hot cooking oil. Let it deep fry for a while. Take them out and drain over kitchen towel.
  • This much of the batter made approx. 20-22 medium size malpoas.
  • Unlike other malpoa which is khoya based and dipped in sugar syrup, these 'Bhaja Malpoas' are very crunchy when relished warm and hot.
  • Store in air tight container stays fresh for 3-4 days.


Happy Cooking Friends and Wishing Everyone - Happy Holi !!

Friday, January 10, 2020

Paneer Makhana Ki Sabzi


Well, we are into a new year and I haven’t yet updated the blog. Let me wish a very happy new year everyone. May you have a happy, healthy, peaceful and joyous 2020.
A fresh start in to a new decade. It makes me pause for a moment to realize that 10 years have passed and in blink of a second, all memories keep flashing by. Well, each year was eventful and memorable and hope the same for you all.Once again- Happy New Year 


I will start this year on a very simple and homely food recipe of Paneer Makhana ki sabzi. As I understand after indulging in loads of sweets and desserts during holiday time, it’s time to go slow on sugar. Paneer a great alternative to chicken or meat can be cooked into a delicious curry.
This paneer makhana was served along with Gobi Aloo-matar -cauliflower potato green peas dry curry.
Now to the recipe
Paneer Makhana Ki sabzi
Recipe requirements
  • 250 Gms of paneer
  • 1 large cup of toasted lotus seeds/makhana in ghee
  • 2 medium size onions
  • 2-3 garlic cloves
  • ¼ inch ginger
  • 1 medium size tomato
  • 1 cup whole cashews
  • 2-3 green chilies

Seasonings
  • 1tsp of red pepper powder
  • 1 tsp of Kashmiri red pepper powder
  • 1 tsp of coriander powder
  •  ½ tsp of cumin powder
  • 1 tsp of garam masala
  •  1 tsp of cumin seeds
  • 1 tsp of Salt or as per taste
  • 2-3 tsp of ghee
  • ¼ cup of cooking oil


Method
  • Cut paneer block into cubes.
  • In a food processor or mixer/grinder, grind onions, garlic, ginger, tomato, quarter cup of cashews and green chilies in to a smooth paste.
  • In a fry pan, add in ghee about 2 tsp, fry the makhana or lotus seeds till they turn little puffy. Take out in a bowl.
  • Now heat up a heavy bottomed fry pan, add cooking oil. Add in cumin seeds. Let it splutter.
  • Add in the prepared paste, add in salt, turmeric powder, red pepper powder, Kashmiri red pepper powder, cumin powder and coriander powder and keep on stir/fry for 10-15 mints at medium high flame. Add in 2 cups of water. Preferably warm water.
  • Add in rest of whole cashews and makhana/ fried lotus seeds and of course paneer pieces.
  • Now cover the pan. Lower the flame and let it cook slowly for about 15-20 mints.
  • At the end add in ghee, garam masala and mix well. Add kasoori methi if you like it as a garnish. You can add green peas also.Serve and enjoy with rotis.


Happy Cooking Friends

Friday, November 15, 2019

Sweet Potato Pancakes


We usually prepare pancakes for our Sunday breakfast. And we have liked simple pancakes, Banana pancakes , Pear Pancake in past. I was inclined to use sweet potatoes in our meals and thought of mixing it with pancakes. 


The sweetness of sweet potatoes gelled very well with simple pancakes. They turned out light and fluffy but when eaten, will leave tummy satisfied for couple of hours. If there is a breakfast that can satisfy the soul and hungry tummy, then sweet potato pancake is the one.
Now to the recipe


Sweet Potato Pancakes
Recipe requirements (Makes – 5-6)
  • 2 large orange sweet potato
  • 2 cups of self-rising flour
  • 2 free range eggs
  • ¾ cup of milk
  • 1 tsp of cinnamon powder
  • Pinch of salt
  • ¼ cup of cooking oil


Method
  • In a big mixing bowl – mix self-rising flour with cinnamon powder and pinch of salt.
  • Boil sweet potatoes for 15-20 mints or till they turn soft. You can pressure cook for two whistles as well. Take out sweet potatoes in colander and drain the excess water. Keep it open for about 10-15 mints before you mash them well.  
  • Now add in egg one at a time, mixing well with flour. Add in mashed sweet potato.
  • Add in milk and mix well till there are no lumps left. The pancake batter should be smooth and a nice falling consistency.
  • Leave it aside for half an hour.
  • Heat up a heavy cast iron skillet /Tava/non-stick flat fry pan.
  • Add in 2 tsp of cooking oil spreading nicely.
  • Now scoop a full ladle of the batter and drop on the hot skillet.
  • Let the bubble surface out. Flip the side of the pancake once you see bubbles pop up nicely.
  • Cook the pancakes for another 2-3 mints. Each pancake will take 5-6 mints on low-medium flame to cook.
  • Serve hot with maple syrup, honey or butter or any other sauces you like.

Happy Cooking Friends 

Saturday, October 26, 2019

Chocolate Pistachio Oats Bars and Happy Diwali


Festival season brings loads of memories of our childhood days. And being away from home means, it’s even more noticeable and felt. 


The smaller things which we took granted while growing up, resurfaces with intense feeling of recreating them in my kitchen. My Ma used to make namkins and sweets during festivals and these things which went unnoticed during those days, suddenly makes sense to me now, when I myself have started to make them from scratch these days. The preparation for festivals itself was a daunting affair but a very memorable experience for each one of us. The small nitty-gritty associated with festivals added up to the much-awaited festival days. 


The Diyas, we used to soak in water the night before Deepawali, and then would sundry next day morning, to be preparing them to light up on Deepawali- the ‘Amavasya’ night. The kitchen used to smell of various sweet aromas infused with desi ghee and the atmosphere around our neighborhood was filled with various sweet and savory aromas coming from neighboring kitchens and homes as well. We used to distribute sweets in our neighborhood and would look forward to the various goodies that used to come from our neighbors and well-wishers very eagerly. 


Deepawali is festival of lights, so diyas, candles and light bulbs were part of every homes, that used to celebrate Deepawali. Let me wish everyone a happy Diwali, may festival of light brings good health, happiness and prosperity to you and to your family.
There are loads of other things which suddenly sprung up in my mind, but I will like to reserve those for some other days.
I wanted to make each one of us notice the festivity, so made batches of Besan Laddos and Kaju Katlis and these Chocolate Pistachio Oats bars and send them over to dear daughter’s school friends and better half’s Deepawali celebrations in his office. Soon it will be Halloween as well and schools over here have closed for half term break, much needed solace from daily routine.


Now to the recipe for this post
Chocolate Pistachio Oats bars 
Recipe requirements ( Makes 40 bars approx )
  • Quick Oats- 3/4 cup
  • 1 bar chocolate ( 150 Gms of 35% chocolate )
  • 1 cup of shelled and chopped pistachios+ ¼ cup more for garnishing (finely chopped and crushed) 
  • 3/4 cup of flour
  • 2 cups of milk powder
  • 1 can condensed milk+ 2 tbs of milk
  • 3-4 tsp of ghee/clarified butter


Method
  • Dry roast flour and oats for about 5-6 mints at medium flame or till the rawness is gone.
  • Take out in a separate bowl. Mix together well.
  • Now in the same pan, add in chocolate chunks and milk. Melt chocolate at low flame, stirring continuously. Take it off from the flame when some of the chocolate chunks starts to melt. You can microwave it also. Trick is not to burn the chocolate.
  • Add in condensed milk now. Mix well and add milk powder as well. Transfer the pan over to flame now.
  • Keep on stirring, the mixture will start to become more like a liquid consistency.
  • At this time add in flour and oats slowly about half a cup at a time, stirring continuously. Do not stop mixing the mixture.
  • Meanwhile grease a tray or plate with about 2 tsp of ghee.I ended up using 2 roasting trays.
  • Keep on stirring for about 7-8 mints, the content will start to collect well. Transfer the content to the prepared tin and even out the surface with the help of your hands or spoons.
  • Let it cool off a bit before you cut them into squares. Let it cool off and then transfer it to refrigerator. You can directly eat from fridge. These bars will remain fresh for about a week if kept in fridge.


Happy Cooking Friends and Have a Happy Diwali !!

Wednesday, June 5, 2019

Phirni - a sweet recipe


We were craving for some sweets for a long while. Phirni is rice pudding with a difference, the difference lies that the rice is grounded and then made into a paste unlike normal kheer where rice grains are used. To me taste wise phirni is a smooth and evenly flavoured pudding with kesar and rose essence water.


I was running short of time, so thought of using rice flour, instead of the whole process of soaking rice grains and then grounding it. This saved me some time as well. Rice flour is easily available these days in many supermarkets and every city has their own chain of supermarkets. You can easily spot them in Indian supermarkets here in abroad.

To the recipe now

Phirni- Sweet Recipe

Recipe requirements

4 and half teacups of whole milk

½ cup of rice flour

½ cup of sugar

2-3 pinches of saffron strands

3-4 tbs of rose essence water
2-3 green cardamoms


Method

In a cup of whole milk, dissolve rice flour slowly and if needed add more whole milk to form a lump free smooth mixture. Keep aside.

In a heavy bottom pan, add in rest of the whole milk. Crush some green cardamoms and add in to the simmering milk. Let it come to one boil. Lower the flame and add in sugar. Keep on stirring.

Now add in rice and milk mixture slowly, stirring and mixing well to make sure it doesn’t stick to the bottom of the pan. Phirni requires constant mixing otherwise the pudding will have lumps.

After about 10-15 mints when the sugar has dissolved properly and the milk mixture will start thickening. Take it off from the flame.

Add in rose essence water and stir once again. Garnish with saffron strands.

Set in individual moulds and chill in fridge for 3-4 hrs. Phirni is best enjoyed when it’s chilled.

Garnishing can be any types of nuts as well.

Wishing a very Happy Eid who are celebrating. Enjoy and have fun. Eid Mubarak!!

Friday, April 13, 2018

French Toast with Strawberry Compote


I have been away from food blogging world for a while now, but that doesn’t mean I was not cooking food or feeding hungry souls in my home. I have tried many local recipes and ingredients during these past days and I have to keep some records for that as well. I may update next couple of blogposts with those ingredients and recipes. But today, I will restrict myself with a delicious breakfast recipe. French toast with strawberry compote. I can’t imagine myself making this on weekdays, as morning is a hurried experience for us. Dear daughter catches her school bus early in the morning and dear husband is also almost rushing through. This scrumptious breakfast needs a relaxing Sunday morning, where one can sit, talk and enjoy the breakfast. Last Sunday made this as our breakfast, thought will share the recipe over here.


I remember a scene in Bollywood film ‘Queen’, where the main lead actress makes French toast for her roommates while holidaying in Amsterdam. And one of them being French himself tells her, well, what she has made has nothing French in it. I know where that was coming from as, French never make their French toast savoury compared to us Indian. French toast for an Indian is mostly savoury served with dollops of tomato ketchup!!  This made me all curious to know the origin of French toast and how it got its name. After many google searches, I came to know that in France it’s known as ‘’ Pain perdu’’ or ‘’Lost bread’’ which is eaten as desserts. This can be accompanied with afternoon tea or an English term for that is ‘High Tea’ snack, but is never made as breakfast. We are grateful to Roman Empire for Colosseum, Pantheon, Spanish steps and Latin language. And to countless inspiration for many Chariot races in Hollywood films ‘ Ben Hur’ for entertainment purposes. I may also like to add French toast to that list as well, as Romans had gigantic appetite for food, three course meal is very Roman. They used to make something very similar dessert with a day old bread or left-over high quality white bread. The first mention about French toast was in a 4th century Roman cook book written in Latin by Apicius.
From those days to its present form French toast has travelled far across, crossed Atlantic Ocean as well. French Immigrants brought their French toast recipes to America and American coined its name ‘French toast’ and from there no looking back.

Now to the sweet recipe for French toast
French Toast with Strawberry compote
Recipe requirements
For French toast
4-5 whole meal bread slices
1 cup of milk
1 egg
1 tsp of cinnamon powder
2-3 tbs of sugar
Cooking oil to pan –fry toast
Method
Mix in egg, milk, cinnamon powder and sugar in a mixing bowl. Put the bread slices in the mixture and let it sit for 5-10 mints.
Put an iron skillet on flame, add about 2-3 tsp of cooking oil over hot iron skillet. Put bread slices and fry them each side for 3-4 mints at medium flame.
Take out and drain over kitchen towels.
For Strawberry compote
300 Gms of fresh strawberry
3-4 tbs of sugar
½ tsp of lemon juice
2 tsp of olive oil spread
Method
Peel the outer skin of strawberries to get rid of small seeds. Chop strawberry roughly into small pieces.
Now put strawberry and sugar in a pot and keep on cooking. After about 7-8 mints at medium flame, strawberry will start to cook .Take off from the flame when sugar dissolves properly.
Add in lemon juice and olive oil spread and mix well. Let it cool.
Assemble French toast with strawberry compote and ice cream on sides. This is heavenly delicious.


and since its Poila Baishak this weekend ....let me wish all my readers ' Shobho Poila Baishaak'

শুভ পয়লা বৈশাখ। .অনেক শুভেচ্ছা সবাইকে। ...

Monday, April 9, 2018

Coffee Timeout - Pulp By Papa Palheta KL


One lazy Friday afternoon we decided to go for a cup of coffee near our vicinity. This café went unnoticed for a while. Pulp by Papa Palheta in Bangsar, Kuala Lumpur is very near to us. 
This designer café is tucked away in a residential neighbourhood, away from hum-drums of crazy shopping malls here. 


The crowd is mostly locals and some from the adjoining industrial area or the office going public. Most of them like to come and unwind after a day’s work in office during weekdays. 


And on weekend the general Instagram public will make a beeline for their coffee. Actually you can find them on weekdays as well. So, yes it’s a very lively and sought after place for coffee lovers and shutterbug crazy people.

I and dear husband were not expecting something out of the world there, but a nice and cosy atmosphere was a welcome change to our mundane routine. 


We got our share of coffee latte, flat white and hot chocolate with a brownie and banana cake slice.


We were satisfied with their blend of coffee. We are not very picky about our coffee either, so yeah for us it was just perfect.Dear daughter also liked her cup of hot chocolate.


We spent almost an hour there sitting, chatting and enjoying our cup of coffee and dear daughter with her share of hot chocolate, also kept both of us entertained with her enticing banters thrown in between.


They also serve big bites aka main entree and breakfast options, in case you have a very hungry and growling tummy. I haven’t tried any of those, so can’t elaborate on their taste and freshness. 


But I was impressed with their range of desserts to go with our coffee. They also house various varieties of coffee that you can buy from them. 
They also serve cold brews in case you like cold things. I was intrigued with their cold brew coffee latte, spiked with hazelnut milk, maybe next time it’s due for me.


The brownie was moist and soft, kind of melt in mouth and the banana cake slice was also fresh and soft. Their desserts scored well for me. In fact, I liked the brownie way better than the banana slice.
The inside of the coffee house reminded us about the old art printing press there.There were some apertures for brewing fresh coffee.


They have remoulded it into a café in the same art printing press premise about four years ago. The décor is nice. Although, it hasn’t got much of seating space as compared to the Instagram and hash-tagged public it receives day in and out. 

Pic Credit- dear daughter

I would suggest to go on weekdays, where you still can enjoy their freshly brewed coffee and sit with your favourite book without interruptions. Another issue is parking which on weekends seems a hassle. 


They also run coffee workshops on many days just in case you need to know all the details of coffee making procedures and coffee beans.

Picture Credit- Dear Daughter
Overall a nice place to spend some time with a cup of coffee with your friends and family in Bangsar, Kuala Lumpur.All pictures are captured with our smartphones.

Picture Credit- Dear Daughter
Please stay tuned for my best place to eat list in Kuala Lumpur for a family in coming weeks.

Monday, October 2, 2017

Peanut Butter Cheesecake with Biscoff


Past couple of days were busy with Durga Puja celebrations at our end. And I find each year it’s the same old story. We prepare ourselves for Puja celebrations and even before we realize it’s almost gone, leaving behind some new memories to look back. Now that the euphoria has subsided and melancholy has set in firmly, we have to keep reminding ourselves ‘’ Ashche bochor abaar hobe’’. This kept echoing in our mind.
Wish you all a very happy Dussehra and Shobo Bijoya.


Anyhow, this cheesecake recipe, I had made earlier, not during those 4-5 days of Nabaratri.We have started liking biscoff biscuits a lot , with a nice caramel flavour these biscuits are very addictive. So its black tea with biscoff , chocolate shakes with biscoff and so on for us now. I thought to make the crust with these biscuits for our next cheesecake recipe and it really came out so nice and delicious loaded with lots of calories, of course. I needed to at least make peanut butter cheesecake once, so the taste of peanut butter can linger on and gets registered in our mind. And this turned out such a nice combination- peanut butter cheesecake with biscoff- absolutely delicious. My folks liked it, hope yours too. From my kitchen to yours. Peanut butter cheesecake with biscoff.

Now to the recipe

Peanut Butter Cheesecake with Biscoff
Recipe requirements
For the crust
  • 2 and half cups of Biscoff biscuit crumbs
  • 4-5 tbs of butter

For the filling
  • 400 Gms of cream cheese
  • 100 gms of peanut butter
  • ½ cup of whipped cream
  • 6-7 tbs of caster sugar

About 2-3 tbs of Chocolate powder for sprinkling on top


Method
For the crust/base
  • Make crumbs of Biscoff biscuit either running through in grinder or pressing with rolling pin. In a big mixing bowl, add these crumbs and butter and mix well.
  • Now take 9 inch round baking pan or any other vessel you will be using to make/set cheesecake.
  • Rub about a tsp of butter evenly on baking pan and add all the biscuit crumbs, pressing gently to even out the surface.
  • Put in to bake for 5 mints at 175 Deg C. Take out and let it cool a bit.

For the peanut butter cheesecake frosting/ filling 
  • Now in a separate and clean mixing bowl, add in cream cheese, sugar and peanut butter.
  • Mix in whipping cream well or till a soft peak is formed separately.
  • Keep on folding cream cheese and peanut butter. You can use mixer as well.
  • Now add the whipped cream to the above and gently fold it.
  • After the base is cooled, add the cream cheese + peanut butter + whipped cream mixture over the baked crust. Even out the surface with a clean knife.
  • Leave the peanut butter cheese cake to cool and set in fridge for about 7-8 hrs or overnight.
  • Take out and cut slices and enjoy delicious peanut butter cheesecake.


Wish you all a very happy Dussehra and Shobho Bijoya ...

শুভ বিজয়ার প্রীতি  ও শুভেচ্ছা। .

Wednesday, September 27, 2017

Kalakand sweet recipe and Sharodiya Shubecha


Festivals without sweets are incomplete .Navaratri has already started and with this the festive season. I have blogged about Kalakand sweet recipe way back .This recipe is version 2.0 with a very minor change. Festivals bring oodles of nostalgic memories with it and most of them leave you overwhelmed like splashing waves. Now, I really don’t want to mention all those memories, it’s there somewhere treasured and always will be. I have written many times about those wonderful memories in past, well those of you who are regular here, know that.

Now moving on to the recipe


Kalakand recipe Version 2.0
Recipe requirements
  • 2 litres of whole milk
  • 3-4 small lemons
  • 1 and half cup of sugar
  • 2 tsp of cardamom powder
  • Almonds for garnishing


Method
  • Kalakand is little time consuming sweet preparation as one needs to make Khoya first and then paneer.
  • Put two vessels with milk each containing about a litre of milk on gas. Let the milk come to boil. Lower the flame and add in lemon juice, freshly squeezed to one vessel. Let the milk curdle. Strain out paneer from whey.
  • Now put the other vessel with milk on low flame.Add in cardamom powder now. Let it simmer for about 30-35 mints or till it reduces to quarter of its volume. Keep an eye on the milk, keep stirring in between.
  • Now keep on stirring the milk and as soon as it starts thickening a bit, add in sugar. Keep on stirring the milk and let the sugar dissolves properly.
  • Now crumble paneer well with clean hands and add this crumbled paneer to the above thickened milk. Keep on stirring with a spatula so that it doesn’t stick to the base.
  • When you start noticing that the mixture can collect well stop cooking further. It will be little semi-dry and the mixture will collect well leaving the vessel sides easily.
  • Grease a plate with some oil. Now take out the mixture on to the plate and spread the khoya+Paneer mixture into the plate evenly.
  • Garnish with some almonds .Let it cool and refrigerate to firm up a little bit.
  • Serve and enjoy delicious Kalakand.

Some more Puja Recipes I have blooged about in past

Durga Puja recipes....

শারদীà§Ÿা শুভেচ্ছা ও প্à§°ীতি à¦¸à¦¬াইকে 

We went to Durga Puja venue here in KL and liked the homely atmosphere. Sharing pic of Durga Puja which is celebrating its 90th year here in Kuala Lumpur. Sharodiya Shubecha sobaike...


Happy Navaratri everyone.Ma Durga bless us all.....Love and Peace to all .....

Monday, February 13, 2017

Chocolate Panna Cotta Recipe


Now that Chinese New year celebrations have ended in our neck of the woods, shops and shopping malls are now decorated with V-day themes. Well, nothing wrong in decorations and shopping for V-day. But to each, for having their personal views, and I am like we don’t need a particular day to fall in love and express love. It can be any day or probably every day. So, V-day or not, love every day, time is running out, if you love/like anyone say it, and don’t hold back. Love almighty god, your parents, your siblings and your family first and last but not the least love yourself for what and who you are. Unless you love yourself or be happy, you cannot love others and make others happy. Ok, dearies no more ranting for today. So, enjoy and have great V-day celebrations, whatever way you all prefer.


We have been craving for some chocolate dessert for a while and what better way in indulging than having chocolate panna cotta.
Now to the recipe

Chocolate Panna Cotta ( Suitable for Vegetarian) 
Recipe requirements
  •  1 cup of whole milk
  • 400 ml cream
  • 6-7 heaped tbs of caster sugar
  • 5-6 heaped tbs of cocoa powder
  • 1 tsp of instant coffee
  • 3-4 tsp of agar –agar powder


Method
  • Put a large pot with milk, cream and sugar on cooking. Let it come to one boil.
  • In a separate cup take 2-3 tbs of warm milk and dissolve agar-agar powder.
  • Mix in cocoa powder and instant coffee powder. Add in agar –agar with milk and keep on stirring till all mix well.
  • Now add the above cocoa powder mixture to the boiling milk and cream mixture. Keep on stirring for another 8-10 mints at medium flame. Now switch off the flame. Let it cool a bit.
  • Pour in bowls /cups and cool. Refrigerate them in  panna cotta moulds or what ever you would be using to set.
  • Set in fridge for 5-6 hrs.  Take out and serve.


Note
  •  You can use gelatin instead of agar-agar if it’s not available.
  • This recipe is suitable for vegetarian as agar –agar is a great substitute for gelatin which is derived from animal products.


Wish you all a very happy V-day.

Friday, December 2, 2016

No- Bake Chocolate and Lemon cheesecake


I was never a fan of classical orchestra music, but don’t know what happens with Hans Zimmer, and I do really like what he creates- these past couple of days I have been listening to his masterpieces- and one is the sound-track of Inception- Time. The tune is so haunting and keeps lingering on. It gives you motivation and sadness at the same time. Another one is ‘A Way of life’. Those are real masterpieces. Any way music is to soul and so is the food. There are many soul satisfying foods as well.


We were carving for some cheesecake and my daughter was asking for a cheesecake for a long time. I was having some left-over crumbs from this recipe of – Chocolate mice, so wanted to use it and it ended up as the crust of the no-bake cheesecake. The slight hint of lemon was also an added bonus. So, the no bake cheesecake with lemon and chocolate flavour was born. The end product was very appetising and soul satisfying just like music by Hans Zimmer.
Now to the recipe

No-bake chocolate and lemon cheesecake

Recipe requirements
For the top

  • 1 and half cup of mascarpone cheese
  • 1 and half cup of cream cheese
  • ½ can of condensed milk (optional)
  • Roughly about 3-4 tbs of lemon juice
  • ½ cup of chocolate powder
  • For the base/crust
  • 5-6 tbs of butter at room temperature
  •  20-25 Chocolate biscuits -
Method
Crush chocolate biscuits in a mixer or you can use rolling pin as well. I have used oats and chocolate biscuit for this recipe (available here as Oats crunch biscuits). You can use crackers as well. The crust was delicious with chocolate flavour and sweet.
Now in a big mixing bowl, mix together biscuits crumbs and butter with your hands. The mixture will be like a moist crumbs.
Take a  round 9'' inch cake tin and put the mixture in to it and press gently to make it firm. This will be the base/crust of no-bake cheesecake.
In a separate mixing bowl mix in mascarpone cheese, cream cheese and condensed milk with lemon juice and about 1 tsp of fresh lemon zest. (You can skip condensed milk if you wish but then you have to increase the cream cheese and mascarpone content and also will have to add castor sugar to make it sweet.)
Now pour this mixture over the base. Tap the corner of the cake tin so that it evens out.
Now sprinkle chocolate powder all over it.I have used Caotina drinking chocolate powder. You can use any other brands as well. But for me it’s Caotina for sure.

Refrigerate the cheesecake overnight. Serve it next day.
Tip- You can use Oreo biscuits as crust as well.

Happy Cooking Friends and have a relaxing weekend

Friday, March 6, 2015

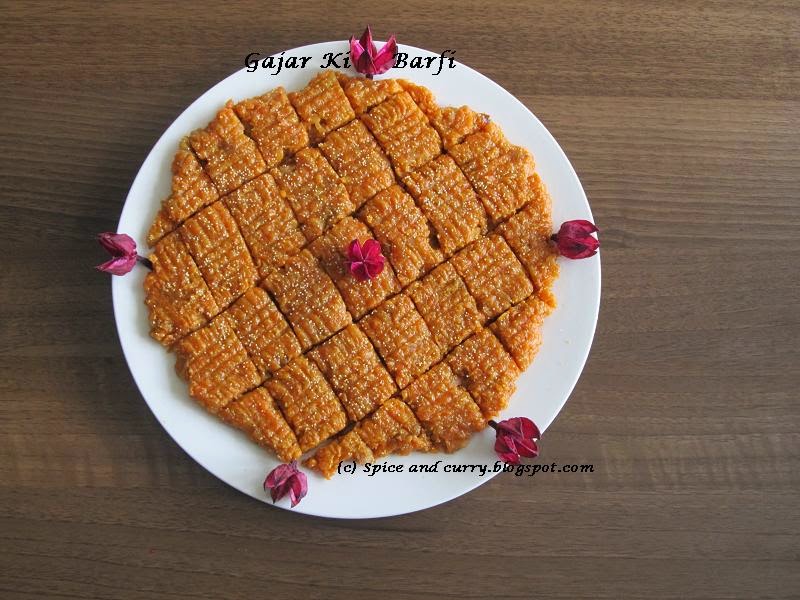
Gajar Ki Barfi - a Sweet Recipe with carrots and Happy Holi

It looks like I haven’t updated the blog for a long time. But then today is a special day also, being Holi , a recipe post is compulsory, isn’t.Ok, but before I jump to write the recipe.First,Wish you all a very happy Holi, may the festival of color brightens your life with hope, happiness and prosperity.
As of now, I have some sweets for you all, gajar ki barfi. Carrrots are cooked, with ghee, dry fruits and khoya and then the end product is, you all know how sweets are.Ek baar khao to khate he raho!!


Now to the recipe for gajar ki barfi ….
Gajar ki barfi- A sweet recipe with carrots
Recipe requirements
  •  4-5 medium size carrots- make 3 cups of grated carrots roughly
  •  1 cup of whole milk
  • ½ tsp of cardamom powder
  •  Half a tin of condensed milk
  •  3-4 tbs of plain flour
  • ¼ cup of white poppy seeds
  •  ½ cup of sugar or as per taste
  • 1 cup of ghee or melted butter
  •  1cup of chopped cashews+walnuts

Method
  • Wash and clean carrots, grate them with a steel grater /shredder.
  • Put a pan on heat, add milk and put the shredded carrots. Let the milk completely dry up. Keep on stir/fry so that it doesn’t stick to the bottom. Cooking is done at medium flame.
  • Now add in chopped and toasted cashews and walnuts pieces. Add in cardamom powder as well.
  • In a separate pan, add in butter about 1-2 tbs, and stir/fry the white poppy seeds for about 5-6 mints or till they barely change into light brown in colour.
  • When the milk has dried up, add in melted butter or ghee. Allow the time to mix ghee and carrots well.
  • Add in condensed milk and keep on stir/fry at medium flame for about 10-12 mints. At this stage the mixture will be runny due to the addition of condensed milk. Allow the milk to dry up.
  • Now, add in stir/fried white poppy seeds to the mixture. Keep on stir/fry so that it doesn’t get stick to the base. Add in plain flour. Once you add in plain flour the mixture will start, collecting well. I have used condensed milk+ plain flour in place of khoya (plain flour acts as a good binder to the mixture).If you get or make fresh khoya, and then you can use it as well. Just wanted to add, khoya is also known as mawa in Hindi, and kheer in Bengali.
  • When the mixture has started to collect well, leaving the sides of the pan easily, stop cooking it further.
  • Now grease a plate with some ghee, and scoop out the mixture over it. With the help of a spoon, flatten the carrot mixture evenly. Allow it to cool. Once it gets cooled, cut it into square barfi.Gajar ki barfi is ready.
  • Sprinkle some toasted white poppy seeds all over. They are soft in texture, unlike the usual commercialized other barfi that we get.
  • Store in fridge and consume within 3-4 days.


And Have a Very Happy Holi 

Wednesday, January 14, 2015

Choshi'r Payesh on Sankranti

The earth rotations evokes season, and with each passing season comes, the festivals that are particularly associated with that season. Winter, although proclaimed to be rather cold, kind of a villain in a film, but even then, there are many festivals, specific of these seasons which prepare us for celebrations. Last year in December we celebrated Christmas. Now it’s Lohri/Makar Sankranti/Pongal/Poush Parbon, actually these all are quite similar functions but with different names particularly region specific in India.
Wish you all a very happy Makar Sankranti, Poush Parbon, Lohri, and Pongal.


Being raised in a traditional family, those never-ending get-togethers, party and festivals, always sounded like a “Mela” to me. Every season has various festivals, and each festival was integral part of our family culture, even including Christmas. And once the New Year ushers in, it was soon time for “poush- parbon”, as in a typical, middle-class, joint Bengali family. Three days were important, every corner of the house was mopped and cleaned and then it was the usual routine of making various Pitha and pulley in our family kitchen. This goes same with my husband’s family. Although it was more rigorous, as it was so specific of Kolkata culture. For us probashi, it was lenient, in terms of cooking pitha or pulley.
My Ma-in-law observes Sankranti for two-three days. Each day a new type of pithey or pulley should be made, like- shoro Chakhali, ranga aloor pithey, Sedho pulley-pitha etc and must is nolen gur’er payesh.I have listed few Sankranti recipes over here.And Sankranti celebrations in my in-laws native’s place without nolen gur’er payesh, is incomplete. Now, My Ma who has  mix of both the world, I mean UP culture and Bengali culture, she makes Sankranti Khichuri and also one of the various pithey only on Sankranti day. For her, a Sankranti celebration is incomplete if she doesn’t make “Sankranti Niramish Khichuri” and “pati shapta”.
Today, I thought of sharing a long forgotten recipe, Choshi’r payesh.As it seems to me now with a vague memory, I can’t recall when was the last time I ate it, so forget about making it in my kitchen. Then I searched in internet, it added to my further disappointment.So, to be honest this is my first attempt of making choshi/chushi.As I can’t recollect the method, I called back home to ask my Ma to guide me with her recipe, while she was telling me about two possible way of making this. One was with atap chal/rice flour and other with khoya+maida.How ever, she is keen on making the choshi with khoya+maida, as it tastes more flavourful.
She herself has seen her grandmother – making “Choshi”- chushi, all from scratch, which obviously is a tedious process, as in those days, there was nothing called commercialization aspects of recipes. So, every home used to make home made rice flour or even making or shaping choshi with their hands. Once the Choshi were shaped and made, then it used to sun-dry. Once the choshi were sun-dried properly, on Sankranti eve or on one of the days during Poush Parbon, they would make Choshi’r payesh.Usually, it was first fried in ghee and when the milk has thickened with sugar or “nolen gur”, the choshi were slowly added to the simmering milk/kheer, finishing off with sprinkling crushed cardamom powder.My Ma has a very melodious and lyrical way of describing the act when the “choshi” should be added to the thickened milk in case it’s made with rice flour as once they are added , it tends to go soggy or fall apart in milk.Put the flame to med-high when you are about to add choshi   and ‘jokhon dudh ta “tog-bog” korey phute uthbe, tokhon chushi ke ashte korey dudh e chere dite hobe,anch ta bondo korey, er por chapa diye rakhte hobe.” (Ok I don’t need to translate that.)
That was a long process, and time –consuming affair. These days, when I don’t have much time on my hand, like many of you, I would suggest make it with “ready-made choshi” which are now easily available in various grocery stores in Kolkata during these Poush- parbon days. And in case you don’t have access to ready-made choshi, then read ahead and try to make it in your home kitchen. If a novice like me can do it, so you can.
Since I have made it with Milk powder+maida, I will just put a note about the Rice flour choshi pithey.All the process of making choshi pithey remains the same except just not making it with rice flour.

Note about Rice flour Chushi Pithey

Take about half cup of rice flour and knead it with lukewarm milk. After the dough has started to collect well, it will be soft to touch. Now divide in two portions. Roll each portion with the help of your palm and shape it like choshi. After the milk has thickened, add in sugar or nolen gur if using it. Let it dissolve completely. Fry the choshi in ghee, just barely to give them a nice golden colour at low flame. Add them in the thickened milk, cover and let it simmer for few minutes. Switch off, and let it cool.


Now to the method which we have made- (My Mother’s recipe)
Choshi’r payesh
Recipe requirements
For the choshi 
  • ¾ cup of milk powder
  • ¼ cup of maida/ flour
  • Or 1 cup of khoya+4-5 tbs of maida
  • 800 ml or  2 ½ -3 cups of whole milk roughly
  •  3-4 crushed cardamoms
  • 5-6 tbs of sugar or to taste or Nolen Gur as per taste
  • 3-4 tsp of ghee

Method
Chushi making and shaping
  • In a mixing bowl, mix in milk powder+ maida. Knead them well, with lukewarm water. Or you may use Khoya if you can get it fresh as that is what my mother uses it.
  • Now after it starts collecting well, divide the dough in to small portions. With clean hands, roll each portion in to a long rope, use some flour if the dough is sticky.
  • Each rope can then further be divided into portions. Roll each portions in to the shapes as depicted in the “how to shape picture”. Now usually at this time the Choshi is roughly 5-6 cm. You can go ahead and make it with this much long choshi. As you can see, I have further reduced the length to roughly 2 cm.Now put them to air dry for about an hour.Unused dough freezes well, and in case you want to fry them all, do so and store in fridge, consume within 2-3 days.Ok to be precise, if you can shape  like "Orzo pasta shape"  then that is nearly perfect.
  • Make other choshi similarly. Do not hurry, take time to roll the choshi, and shape them with gentle hands. The smaller they are chances are they won’t break in the thickened milk.

Now to making  payesh with Choshi
  • Meanwhile you are making choshi, put the milk on heat, Crush cardamoms, and add in to the simmering milk. When the milk has reduced (which at least require 30-35 mints at med-low flame, and stirring in between ), add in sugar.You can also add in nolen Gur, which gives that rustic touch to Choshi’r payesh.And I don’t need to write about the flavor.
  • Put a fry pan on heat; add in ghee/oil. Now fry the choshi on low flame, just barely giving them a nice golden to brown colour.We require about ¾  cup of choshi or two handfuls of home-made choshi.
  • When the sugar has completely dissolved, the milk tends to get thinner, even though it already has thickened earlier. Don’t fret; continue simmering another 10-15 mints. You will see the milk starts thickening again. At this point add in the fried Choshi to the thickened milk. Few minutes of cooking and stop cooking it further. Let it cool.
  • Refrigerate once it gets cooled; consume within 2-3 days. Enjoy the choshi’r payesh.

This is absolutely divine in taste, and if you can make it with nolen gur, I really don’t think, I need to write further.


Note-

Choshi’r payesh -the recipe above is how our home makes it, I don’t claim it to be traditional, as the traditional process is time consuming. If you are making choshi pithey payesh, then make it with rice flour. Although personally I will prefer the taste of choshi payesh, if choshi is made with khoya or milk powder.

Happy Cooking and have a  Happy Sankranti and Poush Parbon.....

Friday, August 29, 2014

Niramish Chana'r Dalna - a Very Basic Bengali recipe

We always play down the vegetarian way of cooking a recipe, thinking that it will turn out plain= fika ranna/cooking.But there are umpteen ways of making a particular recipe and even a simple “ranna” /cooking that one craves for after having rich and high calorie food intakes, can very well be soul soothing and rewarding. Hold on to your thoughts, I won’t be doing  Ayurvedic lectures in this post – lectures giving info about – “pitta” or “vaat” or kapha “ implanting ingredients or their serious advantages- disadvantages  over non-vegetarian foods. Let’s not complicate things over here and stick to basic and simple. My basic is when we are done of eating too many rounds of non-vegetarian foods, one should slow down and eat food cooked with few ingredients or do the “niramish way of making a recipe” sans onion/garlic or even ginger, and using bare minimum spices. 

Niramish Chana'r Dalna with Narkol and Dudh 


Well, when I start with “niramish ranna”, people immediately conclude it with “chana” or “paneer’or should I say “poneer!”….so here is niramish chanar dalna sans onion+garlic+ginger.Although; ginger can be used in any niramish ranna/vegetarian preparation.

I really don’t know where I have first eaten this “chana” preparation. As per my faint memories,perhaps it was when my “Bodo Thamma” my real grandmother’s elder sister made this recipe. Like all the ‘widowed Vaishnavs”, we have seen her live a very down-to-earth life. But strange as it may sound, nobody even forced her to do it. It was her way of connecting with her god. She had an aura of calmness in her ever glowing eyes.Our family respected her for that and used to listen to her wise words, guiding us just like a north star on a dark turmoiled night. Although, I was just a pre-teen kid then, when she passed away, but I have a very diminishing image of her till today in my mind. A strict follower of lord Krishna, she had her various restrictions- white and pure clothes, short-cut hair , no make-up, jewellery  etc.And then making things even complicated, she used to eat only twice a day. Now, I would refrain from giving any other information about her, as some things should remain personal. This type of paneer recipe was again made on a “Puja” day in our parent-in-laws home. Although I can’t recall what spices were added at that time exactly, but it was a very basic and simple “niramish chanar dalna”, not even ginger+tomatoes were used.
 I guess my only contribution is to add narkol-coconut to the above to make it somewhat sweetish at this point. Now coming to this recipe. 


Niramish Chana'r dalna - a Very basic recipe to please God


This preparation comes handy if you have paneer blocks and coconut- fresh or even desiccated one for that matter .The sweetness of coconut merges well with the homogeneity of milk and paneer.Some even use whey liquid in place of milk. Some even may say after reading this recipe- as –“poneer, narkol and dudh with gravy”, I would say go ahead, what ever makes you feel happy about it and try making it in your kitchen as well. But then remember the original source where you first read it. My purpose of sharing this recipe will perhaps be achieved.
Now to the recipe
Niramish Chanar Dalna 
Recipe requirements
200 Gms of paneer cut into cubes
2 medium size potatoes cut into cubes
½ cup of semi-skimmed milk
¼ cup of medium desiccated coconut or fresh scraped coconut
½ tbs of coriander powder
¼ tsp of sugar
1 tsp of salt or as per taste
4-5 cloves
2-3 green cardamoms
2-3 dry red chilies
½ tsp of cumin seeds (optional)
3-4 tbs of cooking oil/sada tel
Method
Since I have used ready-made “paneer” block available easily here, so there is no need of using the whey liquid for the gravy. Instead we will dilute semi-skimmed milk with water and add later.However if you want to use fresh “chana” and the whey liquid then make “chana” beforehand. My tip is to have a small box of citric acid in your pantry for that daily home-making of chana.Few pinches of citric acid and the fresh home made “chana “is easily done. Vinegar can also be used to curdle milk to get “Chana”.
Put a saucepan on heat.At medium flame, first fry the paneer cubes from each side in 2 tbs of cooking oil. Similarly you can fry potatoes cubes. For this recipe I generally don’t even fry the potatoes.take them out.
Add rest of the cooking oil; add in cloves, cardamoms, cumin seeds and dry red chilles.Fry them for about half a minute at medium low flame or till they just start to flare up.
Now add in fried potato cubes. Add in coriander powder and salt. Fry all for about 2-3 mints at medium flame.
Now add in fresh “narkol kora” /scraped coconut. In place of fresh narkol, one can use desiccated coconut as well.
Add in water to the ¼ cup of semi-skimmed milk to make it about 1 and half ½ cup of milk. Now add this to the above.
Let it cook for about 8-10 mints or till the potatoes turns soft. Add in fried paneer cubes and cover the saucepan and let it cook for 3-4 mints. Turn off the switch and let it rest in and also let paneer cubes soak up some gravy.
Notes-
This is a lightest preparation of "niramish chanar dalna" and can be included as part of the “Bhog  Prasad”. However, if you want to jazz up further, then you may add ginger+cumin powder+ garam masala+tomatoes to the above.In place of sada Tel /Cooking oil , one can use pure desi ghee as well.

You may refer these recipes in net for the even more -spiced version of niramish chanar dalna- 


Since today is Ganesh Chaturthi ...So Gannapati Bappa Moorya ....Happy Ganesh Chaturthi everyone...

Happy Cooking Friends