-->

Friday, December 30, 2011

The Year That Was- Bye-Bye 2011- Welcome 2012

Another fabulous year coming to end soon. And as a customary for the past years or so like in  2008, and in 2009 and last in  2010 , just thought of posting a recap of recipes this year as well. Sending this post to Srivalli's Best of the year-2011 food event  .One food event I really look forward to.


In case you have missed any post, this is perfect time to catch up with those missed post.Also my food blog turned 5 this year.So, many things have happened and I tried many new things, many new meal ideas and cuisine.

Starting in reverse order from the very first post in the year 2011,

  1. Lentil soup with Bengali touch- a simple urid dal /korai’er dal with a soupy texture. A perfect bowl of soup to warm up the cold evening.Recipe Link
  2. Creamed Spinach tomato and Chestnut soup- a  healthy soup to warm up a cold evening with toasted chestnut for a change.Recipe link
  3. Traditional pati sapta- Pati sapta made from scratch with basmati rice. If you are little experimental then can check kheer patisapta recipe as well.Recipe Link
  4. Mungfali ki chikki/badam chakti/peanut brittle- Well these are quick snack preparations in case a hunger pangs strike you at odd hours of the day. Give it to your lil ones lunch box as sweet treat or pack it in your travel bag, where ever you go these will remain with you ready to be eaten.Recipe Link
  5. Runner beans cooked in mustard sauce- shorshe runner beans, an easy side dish to make in hurry.Recipe Link
  6. Aloo Marrow’er Ghaint- Marrow is a kind of vegetable belonging to squash family I guess, so the texture this end up is kind of very mushy in any sabzi.Marrow ki sabzi or ghaint in Bengali is one flavorful recipe that can be very well paired up with luchi or paratha.Recipe Link
  7. Vegetarian oats aloo ki tikki- Oats are a healthy option, a very basic aloo ki tikki is enhanced and made healthier by adding quick oats to it. And who doesn’t love tikki chaat right? Recipe Link
  8. Eggless Banana Chocolate Muffin- this is one of my DD‘s favorite muffins and is eggless too.Recipe Link
  9. Poha ladoo/rice flakes ladoo- When some cravings suddenly creep up, have this healthy crunchy poha ladoo.Recipe Link
  10. Oven baked tilapia in coconut milk and tomato sauce- a very quick fish curry with coconut milk and tomato sauce.Recipe Link
  11. Mango flavored sponge cake- a simple vanilla sponge cake is made more flavorful by adding mango puree to it.Recipe Link
  12. Cream of chicken and mushroom soup- a classic soup made in comfy of a relaxed home environment, a soup to fill your heart with much warmth in the cold season.Recipe Link
  13. Gajar halwa- I don’t think I need to add any write up to it!! Recipe Link
  14. Pineapple banana coconut coffee cake- one of the best cakes I have ever made in my entire life.So you can guess about that cake.Recipe Link
  15. Sea bass with cauliflower- an experimental take on traditional bhetki phulkopir torkari as the texture of sea bass is quite similar to our very own bhekti fish.Recipe Link
  16. Fish keema curry- Mach’er keema with loads of spices and flavors.Recipe Link
  17. Fish shammi kababs- a classic kabab recipe with fish as the main ingredient.Recipe Link
  18. Banana blueberry walnut loaf- very delicious breakfast bread.Recipe Link
  19. Keema kofta curry- Chicken mince balls in spicy and tangy sauce.Recipe Link
  20. Spicy sea bass and lentil curry- Masoor dal fritters and sea bass fish curry with tomato, a perfect way to brighten your lunch table with warm cooked rice.Recipe Link
  21. Choto aloor dom- Baby potatoes in spicy tomato gravy.Recipe Link
  22. Wheat bulgur pilaf with chick peas- inspired by Turkish cuisine.Recipe Link
  23. Bori sojne data diye pona mach’er jhaal- Fish curry with wadis and drumsticks.Recipe Link
  24. Lobia curry- black eye bean in spicy gravy.Recipe Link
  25. Koi mach’er jhaal- To me Koi fish is quite exotic as we don’t get fresh supply of this fish back home, but we do get it easily here.Recipe Link
  26. Paka amer ambol- ripened mango sweet sour chutney.Recipe Link
  27. Mach’er dim ‘er jhal- fish roe curry a very flavorful recipe.Recipe Link
  28. Tartar sauce- made with Indian touch, can be a great dip with shammi kababs .Recipe Link
  29. Curried mushroom tortilla wrap- When in no mood to cook, these wraps saves my day. .Recipe Link  
  30. Carrot soup- a healthy soup to brighten our day.Recipe Link
  31. Fried rice with yellow peas and carrots- left –over rice is used in a very innovative way of frying and spicing it up with yellow peas and carrots.Recipe link
  32. Tomato chicken- a very tangy and flavorful chicken curry in spicy tomato gravy.Recipe link
  33. Wheat flour ladoo- Atta ladoo a healthy alternative to besan ladoos in case you wish to try it out.Recipe link
  34. Apple pear oats smoothie- a request and a cute one from my DD and the result was this smoothie.Recipe link
  35. Sea bream fish curry- never made anything with sea bream before i tried making thisSo, was not sure how it will end up but to my surprise this was something a really great discovery for us, the fish and the curry which it goes with it.Now a frequent in our menu plans.Recipe link . also completed five years in food blogging.
  36. Dal chicken pilaf- This recipe is inspired by kedgeree where fish is used with lentils and rice. Instead of fish I have used left over pieces of roasted chicken and dal.Recipe link
  37. Egg curry made easy- dim’er jhal a classic Bengali recipe with absolutely no fry method.Recipe link
  38. Sweet corn stuffed paratha- paratha with spicy sweet corn, an easy paratha for dinner or breakfast whatever way you prefer.Recipe link
  39. Sweet corn kasta kachuri- traditional Upean nashta/breakfast recipe with sweet corn.Recipe link
  40. Pan fried spiced haddock sandwich- a very filling lunch with haddock fish and Italian herbed cheese bread. A flavorful sandwich when you run out of options and are looking for some experimental recipe Recipe link .
  41. Pearl barley soup- a very healthy and easy breezy soup for a very cold evening.Recipe link
  42. Kolkata biryani and kosha murgi- my take on this very famous meal combo.Recipe link
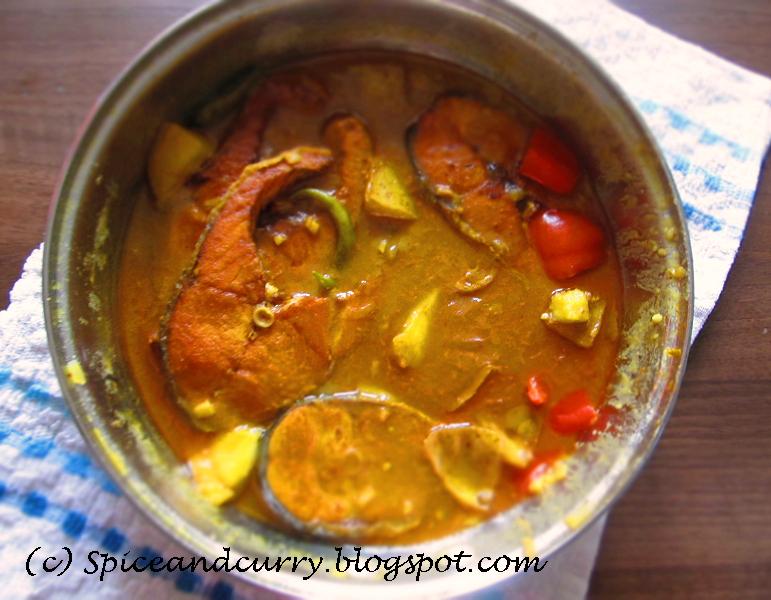
  43. Salmon fish curry- salmon fish curry with potato and red bell pepper.Recipe link
  44. Chocolate chip muffin- an easy muffin recipe for any festive season.Recipe link
  45. Christmas fruit cake- a non-alcoholic and kid friendly recipe for the traditional Christmas fruit cake recipe.Recipe link
I have finally created the much awaited sticky page – my food blog list. You can check it here
If you also want to be included to the food blog list just let me know, I will update the page.

All said and done, be safe in this New Year eve. Be responsible, do not mix alcohol and driving; remember some one is waiting for you in home.

Wish you and yours a very happy, prosperous, healthy and appetizing new year.

Happy Cooking Friends


Friday, December 23, 2011

Christmas Fruit Cake and Merry Christmas


We decorated our small Christmas tree with dazzling decorative. Our symbols for hope, peace and tranquility. In this world of many conflicts, if we can find a little peace within ourselves then perhaps half of the problems would vanish. And peace and joy is the message festive season brings to us all. When we light up candles in a dark cornered room, little we realize that we have lighted candles of hope.


A quiet corner of the living room, which otherwise goes unnoticed , but the moment you keep a Christmas tree all decorated and lighted , that corner of the room becomes special. That quiet corner is perhaps the most peaceful part of proximity; one can create for himself or herself to connect with ones true inner self.

The laughter of a loved one running around that tree. And the tender hands trying to reach out to the top of tree for implanting symbol of peace and tranquility either an angel or a star. Then putting up twinkling lights all around the tree and finally dusting it off with artificial snow flakes. Whatever you can think off, it brings a sense of peace within you. Isn’t?


Sit back, hold your breathe and try to soak this ray of hope, love and laughter that surrounds you and your loved ones. Feel blessed for the little things that happen and will happen to you. Life will go on like it used to be, but you wont find these golden moments again perhaps. Live life with full vigor and zest. After all it’s that special time of the year again.


Our DD made her own magic wand this holiday. She has been experimenting with it quite often and says it works!!


Well we have to believe for the little amazing things she says. And “believing” is what we need these days. Don’t we?
She asked me two riddles the other day, so I am going to ask all to you

  1. What is Santa’s real name?
  2. And what are the names of Santa’s reindeers?

Well, I have no answer to that, I know I can easily google search but just for festive season spirit, I am asking it here. Do let me know if you know the answers to riddles.

Now to the recipe part


Well it’s a sort of a tradition to make rich fruit cake for the Christmas eve .With festive season there is sudden upsurge in having sweet tooth all across the globe. Well, we are no exception either. Over a period of time we have started liking this Christmas fruit cake. This fruit cake recipe is non-alcoholic and kid friendly.

Generally Christmas fruit cake is made at least 4-5 days prior of Christmas Eve so that the taste and flavor gets fully matured in a densely packed very sweet cake. We tend to like less dried fruit and less sweet in our cakes, so I end up using less both.


 I have always followed basic guidelines from  this cake  recipe and adjusted the amount of sweetness and use of dried fruits according to our taste buds. There are other recipes out there like this , this  and  this , which do give concise instructions on Christmas fruit cake but all depend heavily on alcohols or some other ingredients which are not that much available back home.

I have made few changes to make the recipe alcohol free and kid friendly. This has results which are more superior to the Christmas fruit cake you get easily at your local cake shops. Believe me, if you try once in your home kitchen, you wont go back again to your local cake shop to get the Christmas cake.


Christmas Fruit Cake
Recipe requirements

  • 300 g of dried mixed fruit assortments (sultanas, currants, dried apricots, dried pineapple, raisins and cherries)
  • 15-20 walnuts
  • 15 -20 almonds
  • ½ cup of California raisins
  • 15-20 shelled pistachios
  • 1 cup of mango peach juice/ or orange juice
  • 3-4 tbs of cherry jam/or marmalade / or apricot jam
  • 125 g / 1 cup of plain flour
  • 125 g /1 cup of self raising flour
  • 125 g/ ½ cup of butter
  • 140 g/ ½ cup of caster sugar /or 140 g of brown sugar
  • 3 free range eggs
  • 1 tsp of baking powder
  • 1 tsp of cinnamon powder
  • 1 tsp of nutmeg powder
  • 1 tsp of mixed spice powder


Method

  • Crush walnuts, almonds and pistachios while working with rolling pin over your chopping board. If possible slightly toast them on med flame for 6-7 mints in a wok or kadhai.
  • Now soak the dried fruit assortment mixture+crushed walnuts, almonds and pistachios with juice and jam. I happen to have Tropicana- mango peach and papaya juice, so used that. You can use plain orange juice as well. Again, apricot jam or marmalade is good, but I didn’t have any so end up using cherry jam. Since jam and juice already has sugar, I would suggest using less sugar in making the cake. And also if you are planning to make marzipan topping in case, then stick to using less sugar. As marzipan is well quite sweet and rich.
  • This dried fruit and juice mixture needs proper soaking, I have soaked them overnight , but would love to see if it possible to soak this for 3-4 days. Some, Ok, most of the people love to drench this with brandy/rum/sherry. I happen to think otherwise so didn’t add none. But if you do like strong alcoholic flavors in fruit cake then definitely go ahead.
  • The other day, take your time out for making this cake. In a separate bowl, beat in egg one by one. It would be better if eggs can be taken out earlier or at room temperature.
  • Now cream butter and sugar very well. Now, add the egg mixture gently all mixing all through with sugar and butter.
  • Now sieve the flour, mix self raising and plain flour very well. You can use only plain flour as well skipping self raising flour part.
  • Now, add in baking powder, cinnamon, nutmeg and mixed spice powder. Add raisins now if you wish to add little bit more.
  • Add the soaked dried fruits to the flour mixture.
  • Now start mixing the flour mixture and the sugar+butter+egg mixture.DONOT beat the mixture, we need the air so, gently fold it and mix.


  • Preheat oven at 150 deg C. Prepare cake tins. I have two small sandwich tins, so end up using both, resulting in two cakes. However, if you have square cake pans or round Bundt pan, use them to make the cake. TIP- Line the cake pans with greaseproof paper. This will help in even cooking of cake. Cakes otherwise tend to cook quickly around the sides as compared to centre of the cake.
  • Place the cake pans in middle of the rack. Bake them for about 30 mints.
  • Now transfer them in lower rack and switch the oven temperature to 140 deg C.
  • Bake the cake for 1 and half  hrs at 140 deg C.
  • Now take them out and cover with aluminum foil and bake them again for 30  mints at 140 deg C.
  • Switch off the oven and let it sit there for about 1 hr covered with aluminium foil.


Note-


  • Take out and again drench them in juice. If you are using alcohol then drench in alcohol. The cake tends to mature well till Christmas day. You just need to brush with juice or alcohol everyday once .Alcohol drenching also increases shell life, however with juice I am not sure. So, after keeping it covered all through the night, open the foil other day and enjoy. And if you don’t have that much of patience then well I don’t need to tell you what you have to do. Right!!
  • If you wish you can make marzipan topping and decorate it. We just thought it would be nice to avoid even more cream and dried fruits so; a plain slice was just perfect for us.
  • Christmas fruit cake with all that dried fruits is well, very heavy so keep in mind that you are dealing here with a high calorie desert, so eat well and don’t over do it. But all said and done, once a year it’s quite OK to indulge yourself. After all festivity and good food are co-related.
  • You can add brown sugar in place of caster sugar; even muscavado sugar works very well.Muscavado sugar also has long shell life.You can make your own caster sugar by grinding the granulated sugar you have in home in a heavy duty mixer/grinder.
  • This Christmas cake is non-alcoholic and kid friendly. You can very well adjust alcohol content and make it even more flavorful. But trust me on that, if you have made this cake once in your home kitchen, you won’t intend to buy the Fruits cake available in cake shops. And plus point is you know what goes inside this cake.
  • While serving, add a dollop of vanilla ice-cream or just drizzle double cream all over it .Just perfect for a warm evening on Christmas eve with your loved ones.
Updated


Updated to answer the riddles

1) What is the real name of Santa Claus ?
Ans- St.Nicholas and one interesting name is also Kris Kringle.Interestingly a famous movie was made on believing about his existence and which also referred to his name as "Kris Kringle." Movie was "Miracle on 34th Street" which got many academy awards.

2) What are the names of Santa's reindeers?
Ans- Dasher, Dancer, Prancer,Vixen,Comet, Cupid, Donner, Blitzen and Rudolf.Among all of them Rudolf is the most famous I guess derived from a famous story of "Rudolf the red nose reindeer.All other names are from a famous poem " Twas The Night Before Christmas "  a poem written by Clement Clark Moore.

Wish all of you a very Merry Christmas and happy cooking friends.

Tuesday, December 20, 2011

Chocolate Chip Muffins


We like eating various types of muffins.DD has been particularly asking for quite some time now to make chocolate chip muffins, like the ones available here in supermarkets. Now, I have tried making  Eggless Chocolate Muffin in past, which always turn out moist whenever I have had baked them.


Kids tend to develop flavors with each passing years I guess. Initial few years, it was apple muffins/buns .So, was making these Apple Buns quite a lot. Then it was time for egg less chocolate muffins and now her current favorite is Chocolate chip muffin. Well, I thought why not make them. What are Christmas holidays without Christmas goodies?


I have never used self raising flour to make muffins earlier, so never knew how that might end up. I have made pancakes, ice-cream cake rolls with self raising flour earlier. To be honest I do think good quality flour is sufficient to make decent muffin. But in case, you expect kind of a texture angel cupcakes have, light and spongy soft , I would say go ahead make muffins with self raising flour.


Here is how the recipe goes

Chocolate Chip Muffins
Makes- 12 large muffins


Recipe requirements

  • About 2 cups of self raising flour  
  • ¾ cup of granulated sugar
  • ½ cup of cooking oil
  • ½ tsp of baking soda
  • ½ tsp of baking powder
  • 1 tsp of cinnamon powder
  • 1 cup of chocolate chip preferably milk chocolate chip
  • 3-4 tbs of thick yogurt
  • 2 large free range eggs


Method

  • Sieve in flour and then add cinnamon powder, baking powder and baking soda.TIP- Use premium quality self raising flour for soft and light muffin. Add in the chocolate chips to the flour mixture and reserve some to be used later at the time of baking.
  • Now mix in cooking oil and sugar in a separate mixing bowl. Add egg one at a time mixing very well.
  • Add in yogurt and mix well with other wet ingredients.
  • Add chocolate chips to flour mixture.
  • Now start mixing the flour mixture with oil+sugar+egg+yogurt mixture slowly, till all the flour mixture has been used up.
  • Preheat an oven at 175 deg C. Line up the muffin tray with muffin cases.
  • Scoop about 1 large tbs of the above prepared batter and fill the muffin cases. This much of the batter makes 12 large size muffins.
  • Bake for 20-22 mints or till a toothpick when inserted comes out clean. Let it cool a bit 10-15 mints on wire rack. Now transfer the muffin in air tight containers and store them in refrigerator. When having it for breakfast or as a simple snack. Pop it in M/W and microwave at high for 10-15 sec.Viola you are ready to eat.


Happy Cooking Friends

Sunday, December 18, 2011

Salmon Fish Curry with Red Bell Pepper and Potato


School holidays have started here. So for couple of weeks, my mornings would be little relaxed for a change. And who don’t love relaxed atmosphere and especially if it’s Christmas coming near.
This year we got a small Christmas tree and few bunch/packets of decoratives.DD had been enthusiastically thinking various ways to decorate it since the day we got it. Today we finally managed to finish decorating our small tree. I have always felt that being religious is different than being spiritual.


The country and the culture which it offers and that we live in, we should try to imbibe the better aspects in every possible way. There is such a warm feeling about Christmas especially revolving around kids. So, when kids are involved, I do think we should go ahead and make the most out of it.

I am sure you all have started making/baking Christmas goodies. Well I haven’t yet started anything special, so will post the recipes in coming days later. For the time being its flavorful salmon and red bell pepper curry.
We do get salmon steaks here easily. A packet of frozen wild salmon comes with 5 steaks, which serves the purpose well for a small family like us. We slowly are getting adjusted to the new flavor of salmon. As back home, we never tried making or eating salmon in any possible way.


I generally like to smear holod (turmeric) and noon (salt) to every steak pieces, and then put them marinating for about an hour. And then I deep fry the steak pieces in hot oil. DH prefer mach’er jhal (fish curry) with properly fried fish pieces. So this curry always satisfies and serves the purpose very well.

Now to the recipe

Salmon Fish curry with Red Bell Pepper and Potato 
Recipe requirements

  • 5 wild salmon steaks
  • 1 red bell pepper
  • 1 large potato
  • 1 medium size onion
  • 2 fat coves of garlic
  • About 1 tsp of grated ginger
  • 2-3 green chilies
  • 1 tomato
  • Seasonings
  • 1 tsp of grounded turmeric+1/2 tsp of marinating fish steaks
  • 2 tsp of coriander powder
  • 2 tsp of red pepper powder
  • 1 tsp of salt+little bit more for marinating fish steaks
  • Fresh green coriander leaves for garnishing


Method

  • Thaw the salmon fish steaks if using frozen steaks.Tip- Run some cold tap water for quick thawing otherwise do it in fridge for about 20 to 24 hrs.Just shift it from freezer section to fridge section and then wait.Generally if you intend to make fish curry for dinner , thaw it slowly in fridge from morning.Or  run tap water specially cold tap water for quick thawing.But never hot water as it may damage the texture of fish and also may contaminate it with bacteria growth.
  • Then wash them well in water once they are properly thawed and pat them dry. Now rub grounded turmeric and salt generously over each steak pieces. Set aside and leave it for marination.
  • Meanwhile chop the vegetables- bell pepper, potato in equal size. Cut and chop onion, tomato, garlic and grate ginger using mandolin or grater/”kadokus”.
  • Now heat up a large saucepan, add cooking oil.Fry the fish steaks properly both side till it turn out nice crisp brown. Take out and drain on kitchen towel.
  • Now add more oil to the saucepan, add in chopped onion, garlic and grated ginger. Keep frying it for 3-4 mints at med-high flame, gas mark 5.
  • Now add in chopped potato and red bell pepper. Add the dry seasonings- red pepper powder, turmeric, coriander and salt. Mix in well and sprinkle some water.
  • Add finely chopped tomato and slit green chilies. Keep on frying the gravy for about 5-8 mints stirring in between.
  • Add about 2 cups of water. Slowly add fried salmon fish steak pieces. Cover and let it cook for 7-10 mints or till potatoes turn out soft.
  • Serve and enjoy with warm cooked rice.


Note

  • Many a times I do like to add thick coconut milk instead of water only, making it more like a coastal/Malvani coconut milk fish curry.
  • Salmon Steaks needs careful attention while deep frying.Give them enough time for proper deep frying before you flip and turn to other side.Try to maintain a constant flame at med-high or gas mark -5 for proper deep frying.


Happy Cooking Friends

Wednesday, December 14, 2011

Kolkata Biryani and Kosha Murgi/Chicken


Its almost mid of December and soon another year will be gone.Yesterday DD had an active school day with Christmas production in her school.Well she has been very excited about her performance and has been rehersing a lot.DH joined us later in the evening for the performance.DD has been constantly persuing her father to come and watch her performance which incidently he had missed earlier on two occasions for the past two years.
This time DD has been impatient and little bit complaining.So, when she finally saw her father right there from the stage, her face was all lit up even with more confidence.A small request from her side but the memories will going to last forever I am sure for that. This is one of those rare occasions when DH even switched off his cellphone during the performance.Never it was an easy thing to do, but at least just for few mints.

That makes me really wonder are we loosing out the oppurtunities where we can truly seek out happiness in doing simple things or chores as simple as watching our children perform for the function or just going out for a walk together.Well I will leave out to you, to decide.

Now to the recipe


Kolkata biryani – does it ring any bell. Well even it doesn’t, I would say no problem with that. I  , We ( DH +Me ) have been an avid lover of light and fluffy biryanis churned out from the various kitchen of modern dastarkhans in Kolkata read here Shiraz/Arsenal/Rehmani a etc..I really can’t remember when we first had our first brush with those delicately and lightly flavored fluffy biryanis.What goes inside those kitchens I really don’t know, but they have been serving Kolkata people for a very long time now with all those delicious food.
I don’t want to endorse any particular restaurant but if you ask me, I would prefer any day going to these food chains rather than to a very posh, articulate and sober restaurant where things are way too much dramatized. When I mean food, I mean good food at affordable price. You eat and enjoy the taste slowly hitting your palate. As simple as that.


I have been thinking about a delicately flavored biryani for a long time now. I remember going to one of SBM’s Pishima’r house (paternal aunt’s home) and being served with 7 course meals at lunch time. Those were our initial married days and every one was rushing to call us home for a lunch or dinner date. So, we have been eating quite a lot of rich foods but of course home-cooked meals. We Bengalis have this inner feeling of showering love and affection by serving food to newly married couples. No, and we also feel offended if the newly married couples don’t eat properly. I was very thin then so my eating portions were less. They all used to say then “Boumar Khaba ta Pakhir khaba, bhalo korey khete shikhte hobe.” Meaning -She eats like a bird, got to improve her appetite. Now, things are different, I am no more thin (ah! distant dream ) and well about appetite, what more can I see, you all are reading this blog for the past 5 years.


Coming to the important part here. What I remembered was a very delicately flavored and aromatic fluffy biryani served with a fried half potato. They called it Kolkata Biryani.Now, my introduction to Kolkata culture had just started then. So, everything which was intriguing always caught my attention. I had never heard of Kolkata biryani , may be that was something to do with the upbringing part which was outside Kolkata and in the northern belt of India. I remembered a 7 course meal was served. All the recipes were cooked to perfect 10.There was bhaja moong dal, aloo bhaja, begon royal (SBM’s cousin sister M made that from a popular Bengali magazine-Sanonda) Then it was chingri malaikari, kosha mangsho, delicately flavored Kolkata biryani which had every rice grains cooked to perfect 10.Then it was all sorts of assortment of mishti-chom-chom, langcha, sandesh, rosogolla and not to mention chatni and mishti doi. What a feast that was, but then it ended up on taking medicines like Digene.Thats another story.Well which Bengali home doesn’t stock Digene. Right?


That delicate flavor of Kolkata Biryani lingered on our taste buds for long time. And then that urge to re-capture, re-create that lost flavor hit me so hard that I decided to made it all by myself here far away from home. I don’t have a luxury to call my favorite food chains (arsenal/rehmania/shiraz) for a quick home delivery. And the kind of food that is made in restaurants here in abroad, I would say I am at least better doing it in my small kitchen in this small apartment with limited set of appliances/pots etc - which I call, BTW my home now.

So, this is how I made it.

Calcutta biryani and Kosha Murgi/chicken

Recipe requirements
A base masala paste used for both the recipes
2-3 large  white onions
5-6 fat garlic pods
½ inch ginger
2-3 green chilies
5-6 walnuts
10-12 almonds
10 -12 cashews
Before you pulse through to make a smooth paste, it’s necessary to blanch the walnuts, almonds and cashews.
M’/W at high a large cup of water to make it warm enough. Soak all the dry fruits for 15-20 mints or till they become soft and you can easily peel off the skin.
Now pulse through in heavy duty mixer grinder all- onion, ginger, garlic, green chilies, walnuts, cashews and almonds.
Divide the batter in two portions. Use more for Chicken kosha and less for Kolkata biryani say just about 2-3 tbs.

Kolkata/Calcutta biryani

Recipe requirements (serves 3-4)

  • 1 and half cup of basmati rice
  • 2-3 tbs of above prepared masala paste
  • Yogurt -2-3 tbs
  • ½ tsp of Nutmeg powder ( jaiphol goron)
  • 2 tsp of Garam masala ( or use cardamom/elaichi powder+ cloves/long powder – I didn’t had cardamom and cloves so used packet garam masala available here)
  • 2 Potatoes cut into large cubes with skin on and properly fried
  • ½ cup of raisins (optional )
  • 3-4 tbs of cooking oil/ghee
  • 1 tsp of salt
  • 2 tsp of sugar
  • Saffron strands (8-10 ) soaked in lukewarm milk (optional)


Method
I will go with how I made it, irrespective of various other methods of preparing Calcutta biryani.

  • First of all clean rice twice in water, not more than that as it may turn the rice grain more prone to breaking at the time of cooking.
  • Soak them in some water, again not more than 10-15 mints which I would recommend doing it.
  • If possible dry them over news paper or kitchen towels, but not necessary as I always do make the pulao skipping this part, well not an excuse but always end up short of time.
  • Ok when the preparation of rice is complete.
  • Now shift your attention towards frying the masala paste which you took it out from the main paste you prepared earlier.
  • Heat up a large pot enough to hold and cook the rice. Add little bit of oil and fry the potatoes well.take out and drain.
  • Add cooking oil, add the masala paste and fry very well. Add the fried big potato dices as well. Kolkata biryani is incomplete without a portion of fried potato. Trust me on that.
  • Add dry ingredients like turmeric powder (holod), red pepper powder (lonka goron), nutmeg powder (jaiful goron) and garam masala.Or use elaichi powder+long powder in equal portions.
  • And add whisked yogurt as well. Adjust salt and sugar.
  • Keep on frying the paste till it releases the oil or becomes a little dry.
  • Now add the rice and fry. Do not stir it continuously as it may break the rice. Stir at frequent intervals so that it doesn’t get stuck at the bottom. If you need to add some more cooking oil then add it right at this moment.
  • Add about 2 cups of water or the level of water should be at least 1’’ inch above the rice level. 

That is how my father always showed me cooking dum ka biryani.It’s a basic rule I always follow while making dum biryani.OK, to be on an adventurous note- my Baba always used to put Nora over the large dekchi which was used for making dum ka biryani…We had a large joint family and the dekchi was quite something huge, if not small or large. Feeling nostalgic!! Coming back to recipes here

  • Add the raisins to the above.


  • After adding the water, seal the sides of the pan (my poor steel saucepan pan looks nothing near to elegant as compared to the huge petol dekchi/ brass pan I was referring to) with some kneaded atta dough. This locks the moisture essential for dum ka biryani.
  • I happen to cook this over my iron  tava.But again it’s not necessary. You can put the pot on very low flame and cook.
  • Put the flame at low or gas mark 4 and cook the rice for 30-35 mints. Do not hurry and try to open the seal. I would say open after 1-2 hrs later.
  • Before serving biryani, sprinkle the saffron flavored milk generously. And close the lid. Let people enjoy what they get at the dinner table.


Note-

  • This recipe is truly a basic attempt to recapture all the biryanis I , we have eaten pleasurable in many food chains back in kolkata.Arsenal/Shiraz/Rehmani are just few names. I really don’t know what goes behind those kitchens which churn out such delicately flavored biryanis and kabab years after years. But for me this recipe was very delicately flavored and light.
  • Kolkata biryani is incomplete if potato is not added. As this is the distinctive part of biryani which separates from other regional biryani.Why?? I would say then it must be something to do with recession at the time when Awadhi cuisine was making its presence felt in Bengal. Meat was replaced with an easily available option and that was potato.
  • Tomato is not added in this biryani ,so in that place I have used thick yogurt to give the proper texture.
  • Again coriander leaves/mint leaves or curry putta is not added as many relative biryanis do include them. I would say if you prefer adding them, do so just for decorating or garnishing. I have never come across Kolkata biryani even with garnished coriander leaves.
  • Many a times I do cook the rice initially ¾ ways and then leave rest to cook with the masala paste. If you like even more light and fluffy biryani, then precook your rice grains and then mix in with the fried paste and seal it with very little aromatic water –you can read the recipe for akhnir jhol/aromatic water here. M/W at high for 4-7 mints covered or pop it into oven .Bake at 175 deg for 10-12 mints. Take out and sprinkle the saffron flavored milk and cover again. Do not open the cover from now on. Let it remain covered for 1 hr.At the time of serving open the cover/lid of pan or whatever you are using and then enjoy.


Kosha Chicken recipe  ( my way )


Recipe requirements (Serves- 3-4 )

  • 4 large pieces of chicken or 4 drumsticks or leg quarters 
  • The masala paste which is prepared above
  • Seasoning
  • 3 tsp of coriander powder
  • 2 tsp of garam masala
  • 2 tsp of nutmeg powder
  • 1 tsp of salt
  • ½ tsp of sugar
  • 4-5 tbs of cooking oil

Method

  • Clean the chicken pieces very well with water. And then pat dry them. I happen to use the chicken pieces with skin on. I trimmed some major portions for fats and then cut the skin leaving some traces here and there little bit. I would say the skin of chicken do release some rich oil when it’s cooked which do add to the flavoring of gravy. However if the smell of skin puts you off, then skip it completely. Again I would say the final product what you do eat is excellent without any skin smell as we will be using loads of garam masala for making kosha chicken.
  • Marinate the chicken pieces with the basic paste you prepared earlier, reserving about 2-3 tbs of paste.
  • Heat up a saucepan, add cooking oil and let it heat properly. Add the reserved 2-3 tbs of masala paste.
  • Season it with turmeric, red pepper, coriander, nutmeg powder and gram masala.Sprinkle little bit of water.
  • Add the marinated chicken pieces with the entire marination. Now keep on cooking the chicken uncovered for about 30 mints. Stirring frequently so that it doesn’t get stuck at the base. Add about ½ cup of water if the chicken has become too dry. Cook further 10-15 mints or the chicken is tender and juicy. Prick with a fork to assess the softness of chicken.
  • Drop in about 2 tbs of cream or butter to enhance the flavor. Mix in well.
  • Kosha chicken is ready to be served with mild flavored Kolkata biryani.


I do hope you all get some time to make this light and delicately flavored Kolkata biryani some day and try the kosha murgi also.

Updated
 Updated to include other recipe version of Kolkata Biryani.

Updated on 3/01/12


  1. This time made the biryani without cooking it over tava/skillet.
  2. Added some chopped potato cubes, mushrooms and carrots , just to include more vegetables.
  3. Omitted adding turmeric powder completely.
  4. Used extra long high quality rice grains.
  5. Cooked at med-low flame.Added water just above half inch to the entire rice mixture level .Well that includes milk+saffron mixture.
  6. Cooked it , till all the water is used up.Then took it off from the flame.Allowed to remain covered for about 10-15 mints and then open it.


Happy cooking friends.


Friday, December 9, 2011

Winter Vegetarian Pearl Barley Soup


As gusty wind is hitting furiously in our neck of the woods past two days, temperature has predictably gone low. Well in this weather all we need is this comforting bowl of piping hot soup. Luckily it was sunny today but there was a sudden amount of chill in the air.


I was doing grocery shopping the other day and when I passed near the world food cuisine section, I picked up my favorite couscous as usual. And then my eyes got stuck on simple white shinning grains. When I picked it up it looked more like wheat kernels but then they were white not golden yellow.
I looked up the label and it said pearl barley. Pearl barley is -well why I should tell you. Jokes apart read read here in wiki  to know more about it.
Not to be confused with hulled barley where the outer important shield is retain which gives even more nutrition.


There is nothing royal about this recipe, no exotic ingredients being used, but believe me this taste just heaven. I mean a simple soup can really fill you up and it’s ridiculously simple, what more can I add about it. I really wonder why I haven’t come across this great source of nutrition earlier.
DH finished his bowl of soup like hot cake and helped himself with second helping. Then it was my DD’s turn to have her second helping. And I was so delighted that how a simple dish like this can bring our dinner table alive. I started wondering why pearl barley hasn’t received its due credit.

I searched our reliable source internet for various barley recipes. And many of them have beef, or lamb or chicken, but were looking for a vegetarian option. So came up with this recipe. However I would suggest reading this, this and this   post for other interesting pearl barley soup recipes as well.


Although any root vegetables like carrot/parsnip etc or leek/celery is used to make barley soup, but I had none at the time of making this soup. When I opened my fridge I saw some mushrooms and carrots. Well of course I had onion and garlic. So, based on these ingredients I started to make this soup.
I do think pearl barley need 35-45 mints of proper cooking. I was in hurry so, I pressure cook the pearl barley. And it was ready in 10 mints.

All you people just try making it, you won’t be disappointed.

Winter Vegetarian Barley soup

Recipe Requirements (Serves 3-4 )

  • Pearl barley- Roughly  1 to 1 and half cup
  • 1 cup of pasta ( fusilli or penne works fine)
  • Vegetables of your choice
  • I happen to use about 2-3 large carrots and
  • About 200 gms of mushroom
  • 1 yellow bell pepper
  • 2-3 large tomatoes

Seasoning

  • 1and 1/2  tsp of Salt
  • ½ tsp of Crushed chilly flakes or 1 tsp of black pepper powder
  • 2 tsp of dried thyme or fresh thyme which ever is available
  • Little bit of sugar (optional)


Method

  • Chop all the vegetables roughly into equal size.
  • Pressure cook barley for one whistle at high. Stop the flame and then open when pressure subsides properly.
  • Meanwhile chop tomatoes in half and make roughly 4-5 slices. Transfer them to baking pan. Drizzle cooking oil over them.
  • Preheat oven at 200 deg and roast tomatoes for 20-25 mints.This way they tend to retain even more flavour.
  • Now bring a large pot with water to boil. Add all the chopped vegetables, pasta and half of roasted tomatoes.
  • Open the pressure cooker lid; add in other half roasted tomato. This time add more water about 2 large cups.
  • Mix the ingredients in two pots in to a large cooking pot. Cover and cook until pasta is tender , about 10 mints.
  • You may wish then puree the ¼ part of the soup for the thick and creamy soup version.


Note -

  • One thing should be kept in mind is that since this soup has barley and pasta both this tend to soak the gravy a lot. So, you may see that at the time of serving it turns out thick. So, keeping in mind this it’s necessary to add enough water or any broth/stock before hand in ample amount.
  • You may use ready-made vegetable or chicken broth for this soup. I didn’t wish to do, so I made it all from scratch.
  • Serve warm with some cheese. I didn’t like it with cheese but my daughter likes this soup with mozzarella cheese. Enjoy this warm bowl of soup after a day’s hard work or even just for yourself as a real soul warming treat.Don't tell me you need a reason for that.


Have a nice weekend and Happy Cooking Friends.

Monday, December 5, 2011

Pan Fried Spiced Haddock Sandwich with Tartar sauce


There are some times when I really don’t like to cook anything and that too specially for me as DD is off to school and DH in office. I would say those lunch time, this Couscous salad  comes handy or a Curried mushroom tortilla wrap,  just works fine for me.
These days I am quite addicted to pan fried spiced haddock. I like it with a side dish of warm cooked rice even. Now, there are some days when I generally like to try out something different but with pan fried spiced haddock. That time Italian cheese bread comes handy for me. No, I haven’t baked them but got them fresh from our local supermarket where they make fresh breads, rolls etc daily.Some day may be I would try my hand in making fresh Italian herbed bread in home too.


If you plan accordingly, you can assemble this sandwich quickly. I do generally like to marinate the haddock fish fillet in night with all the spices, so that next morning I can pan fry them and assemble this sandwich quickly. And there are plenty other options of using other sandwich like soft dinner rolls or a plain Italian herbed bread.

I really don’t know if puritans will allow me to have the liberty of calling this food as a Fusion food of sort. But given a choice I would definitely make the fish with Indian spices, then pan fry it and serve with my favorite Italian cheese or herbed bread for a change of flavor and new twist.

Now to the recipe of

Pan Fried Spiced Haddock Sandwich with dressing of Tartar and Mustard sauce
Recipe Requirements

For the pan fried haddock fish recipe

  •  1 large Haddock fish fillet with skin on – cut into 2 inch *2 inch long portions and not more than ½ inch in width- often the portions near the tails are less in width and fry out well. But the portion at the tummy is quite thick and needs proper marinating time to absorb the marinating flavours. If using portions near tummy then make small parts of 1inch * 1 inch.
  • You can use smoked haddock as well.They do give a nice touch to this pan fry spicy haddock.
  • For marinating the haddock fish fillet-
  • 1 tsp of crushed red chilly flakes or use more for more spice
  • 3-4 tbs of lemon juice, freshly squeezed in from lemon
  • 2 tsp of MDH kitchen king masala
  • 1 tsp of dhania powder/coriander powder
  • 1 tsp of garam masala
  • 1tsp of salt
  • About ½ cup of roughly chopped fresh tender parsley


For frying the haddock fish fillet

  • ½ cup of all purpose flour
  • ½ tsp of baking soda
  • ½ tsp of red pepper powder
  • ¼ tsp of salt
  • ¼ tsp of garlic powder
  • Mix well the dry ingredients

Method


  • Wash the haddock fish fillet and then pat dry them with kitchen towel.
  • Now mix all the marinating ingredients-red pepper flakes, Kitchen king masala, garam masala, and coriander powder, salt and chopped parsley. Cut a lemon and squeeze fresh lemon juice from it. Use generously. Mix all the dry marinating ingredients with lemon juice. This forms our marination. Now coat well all the portions of haddock fillet very well with this marinating sauce.Cover with foil, and then refrigerate it at least 1-2 hrs. Tip- overnight marination yield best result and this is what I generally do.
  • The other day at the time of assembling the sandwich, take out the marinated haddock fish fillets at least ½ hr before you do start pan fry them.
  • Now make the flour mixture over a serving plate, this way you can easily coat well all the fish fillet. If you would like to have a more detailed instructions then visit this post of Bhekti Fish Chop . The recipe is quite similar but with a fish called as bhekti fish ( a quite similar type of fish is Sea Bass which is available here easily )
  • Mix flour, red pepper powder, salt, baking soda and garlic powder. Tip- you can use self raising flour as well, then it’s no need to add baking soda.
  • Heat up a frying pan well, and then add 4-5 tbs of cooking oil.
  • Coat very well the haddock fish fillet with the flour mixture. Dust off excess flour and then again coat well the haddock fish over flour mixture. This twice coating helps to seal the flavor most. Or you can use an egg wash after first coat. Then again dumping those in flour mixture after you have coated them in properly fluffed egg. Some even try the beer batter coating but I haven’t done that.
  • Frying the fish is tricky here. Fry them med-high flame /gas mark 5.
  • Each side should take at least 3-4 mints max and when properly browned, fish can be flaked easily with the fork. Fry maximum of two fillets together this way, giving them enough room for proper frying.
  • When both the sides have fried well. Take out and drain over tissue paper.If you have done it this way thro, then another 5 mints and you will be having your lunch.


Now to the assembling of sandwich

  • Cut vegetables of your choice. I like to have onions/cucumber/tomato and lettuce leaf for the filling along with these pan fried spiced haddock.
  • M/W for 30 sec to 1 mint to warm the Italian cheese bread.
  • Generously spread tartar sauce.For the detail recipe of tartar sauce Go Here. Or you may use simple mayonnaise and mustard sauce dressing for this sandwich. Dressing the sandwich is essential as this gives some extra kick to the dish.
  • TIP- You can use “Kashundi” in place of mustard dressing as well.”Kashundi” is a traditional Bengali sauce preparation with mustard seeds. It has a very strong flavor of its own. People say an authentic “kashundi “when eaten should give an instant kick/hit to your palate.
  • TIP- You can also use Peri-peri sauce as well for dressing purpose that also adds whole lot of flavour and kick.
  • Now place the pan fried spiced haddock over the toasted and warmed Italian cheese bread.
  • Then layer the cut onions/cucumber and spread some more tartar sauce as well.
  • Serve along some fried potatoes or steamed sweet corn. 


A perfect easy and lip- smacking lunch is ready. 
I couldn’t resist myself so the corner is already eaten in all the pictures. Hope you all, don’t mind!!

Happy Cooking Friends


Wednesday, November 30, 2011

Sweet Corn Khasta Kachori and Black and White Wednesday


It’s generally simple roti/chappati for us on most of the nights as part of our dinner menu.And occasionally some parathas especially aloo, or gobhi or methi or gajar etc as winter has started in our neck of woods. And even once in a while keema paratha.I have seen my ma and ma-in-law making enormous efforts during winter to make koraishutir kachori/green peas kachoris.So, every winter when we do get fresh green peas pods, we have seen many afternoons being spent shelling peas together amidst some gossip and tea.


But with fast paced life, everything has become so instant. Instant mashed potato, dissolve warm water and it’s ready. Instant coffee, dissolve warm water and a cup of cappuccino is ready. Put frozen potato bites in oven and it’s ready in minutes. Green vegetables all neatly chopped and cut and sealed in a bag, ready to be eaten or stir/fried.
You need mango in winter, no problem, get back home canned and sliced mango or use a can of pureed mango, all available entire year. And if I have to list frozen food, my lists will never going to end. You need green peas, and then go to a supermarket and come back home with packaged frozen green peas or for that matter sweet corn.


.
Well, it does save time and our efforts in kitchen so that we can juggle our professional life and family time and do things which almost a decade ago was never heard off. Read here blogging and social networking. But with every milestone there comes some prices to pay.
When I try to recall some memories from past, I do miss those healthy interactions with family members, a little chit-chat, some neighborhood gossip while shelling peas, you know when all the kakimas, jethimas or mashimaas, cousins, nieces etc would gather around a table and start shelling peas amidst all the talking.
Then somebody would come up with hot fried onion fritters and tea. Or even sometimes would be healthy sibling rivalry where one would compete with brothers and sisters about piling up heaps of shelled peas at a stretch.


Small Pleasures, but it did give us great happiness; and I am sure which a frozen packet of green peas or sweet corn can’t bring along with it.
This time, I didn’t have options, so end up using frozen sweet corn for these Khasta Kachoris.

( "Kachoris" are kind of a pastry stuffed with any dry filling mainly vegetables and then deep fried in oil.Although the shape is different but it's quite similar like a Mexican Empanadas is or perhaps a Italian Calzone is  , but it's then deep fried and not baked.)


You can make it and pack it when you are traveling in trains or by car.And even give them in your kid’s lunch-box as once -in –a- while- savoury treat.

Sweet corn khasta kachuri/kachori 
Recipe requirements
For The stuffing of kachuri


Roughly 3-4 cups of frozen sweet corn
1 inch ginger
1 tsp of cumin powder
2-3 green chilies
1 large onion (optional)
1 tsp of red pepper powder
¼ tsp of grounded turmeric
2 tsp of dried oregano or carom seeds powder (Ajvain in Hindi, Jowan in Bengali)
½ tsp of salt
Pinch of hing/asafetida


For the dough
3-4 cups of whole wheat flour/atta
1/2 tsp of baking soda
salt
1-2 tsp of cooking oil (moyen )

Method

  • Take sweet corn in M/W safe dish and Microwave at high for 1-2 mints till they turn soft.
  • Let it cool a little bit, transfer sweet corn in the mixer jar, and add in ginger, green chillies, onion, red pepper powder, grounded turmeric, cumin powder.TIP- you can add in freshly toasted cumin seeds if you wish to get a nice aroma of cumin. Many a times I do like to add whole black pepper when I am not using green chilies. That addition of black pepper gives a different flavor. Pulse through till they turn out little coarse. I do generally like to make a coarse paste rather than smooth paste as it leaves some crunchy bites after the kachori is fried. If you do wish to make niramish (vegetarian kachuri during one of the festive season, then skip adding onions)
  • Now add 2-3 tbs of cooking oil, add the above made coarse paste. Add hing as well.
  • Now fry the paste for 8-10 mints till it becomes dry and leaves oil by the side. If you need to add more oil then do so.
  • Take out when it’s almost dry and have become quite dark. It will take 10-15 mints at med-high flame. Check in between if they do not get stuck.
  • Now knead the dough for the kachori.Take about 4-5 cups of whole wheat flour or atta. Generally a Bengali kachori is made with refined flour, but I have always seen in my Upean friend’s home, they do like to use atta/whole wheat flour for making kachori. I end up using atta in this case.
  • Add in about ½ tsp of baking soda and salt to make the kachoris all crunchy and kasta.If you think you want a soft kachori then do not use baking soda but knead the dough very well up to a palpileable consistency.
  • Add 1-2 tbs of oil (moyen ) and knead well with splashing little bit of water in between. Set aside and cover it. Let it sit for 2-4 hrs before you start making kachori.
  • Divide the kneaded dough into small balls, size of a golf ball. Roll one small ball with rolling pin, place the stuffing in middle and seal the sides working with your palms. Again roll while dusting with some flour, into small disc.
  • Ok, now after that, heat up a saucepan, add oil up to half. I do not have any kadai or wok, so end up using flat saucepan. However, I would strongly suggest using kadai/deep bottom pan or wok for frying kachoris, as this gives ample space to kachoris and they do fry well.
  • Now take out when both the sides have become golden to light brown. Place them over tissue paper so that it soaks up extra oil. Keep on frying rest of the kachoris.Serve warm with some chutney or aloo ki sabzi.

Sweet Corn Khasta Kachuri and hot tea, heaven !!


"Kachoris" are kind of a pastry stuffed with any dry filling mainly vegetables and then deep fried in oil.Although the shape is different but it's quite similar like a Mexican Empanadas is or perhaps a Italian Calzone is  , but it's then deep fried and not baked.)

and kachoris in B/W mode.Today is wednesday so sending this to Susan's Black and White Wednesday.....


Happy Cooking Friends

Sunday, November 27, 2011

Sweet Corn Stuffed Paratha


Whenever we go for grocery shopping I end up purchasing huge bags of frozen sweet corns. We like them steamed, with dash of red pepper powder, lemon juice and butter .These cold wintery days, this has been a frequent side-dish as part of our dinner menu. If you wish to get into the details of steamed sweet corn, then there is particularly no recipe for a very manageable easy steamed sweet corn. I am sure all you need is just have a look into your pantry and some imagination to churn out various versions of steamed sweet corn.


When it’s cold wintery days, what I like most when we are strolling around in some corners of big shopping malls whether in Delhi or may be in Kolkata, is that one can taste so many variations of steamed sweet corn. I happened to taste my first cup of hot steamed sweet corn in Ansal Plaza a big shopping area in Delhi which was almost a decade ago. From then and now this has been our favourite street food. We have gorged on steamed sweet corn in Noida Sec-18 markets and last I remember was when we were perhaps in City centre -1, Kolkata. Well City Centre-2 in Kolkata is even ready and is an upcoming big area with lots of good shops and eating joints as well.


Never imagined a simple recipe of steamed sweet corn can be so appetizing and soul warming. These days there are many places even in London (South hall high street and Hounslow high street) where you can easily get steamed sweet corn selling food corners just like a hamburger food cart in NY or any other place.


If I have to make a list of my favorite street food I would definitely pick steamed sweet corn as my top 5 street foods. But then if you don’t like street food version then hop onto your nearest supermarket and get back home with huge economic bags of frozen sweet corn and then some imagination and yeah you are ready with the steamed sweet corn in jiffy.

But this post is not about steamed sweet corn only. This is a little more evolved form of utilizing the spiced sweet corn, they end up being used as stuffing for our breakfast parathas or dinner kulcha parathas.Since winter has started in our neck of the woods, I would be making more sweet corn parathas and steamed sweet corn that’s for sure.

Now to the recipe of sweet corn paratha


Sweet Corn Stuffed Paratha
Recipe requirements
  • 3 cups of whole wheat flour or atta
  • 1 cup of frozen sweet corn
  • 2 tsp of red pepper powder
  • 2 tsp of coriander powder
  • 2 green chilies chopped very finely (optional)
  • ¼ tsp of grounded turmeric
  • salt as per taste
  • Oil to make paratha+some more to fry the stuffing

Method

  • Knead the atta/whole wheat flour as semi soft dough with little bit of water. Keep it covered and proceed to prepare the corn stuffing.Let the atta dough sit for at least 1 hr.And before making the paratha just add few drops of cooking oil and knead well again.
  • M/W at high frozen corn for 1 mint.
  • Heat up a pan, add oil and sauté gently sweet corn. Add all the seasoning- grounded turmeric, red pepper powder, coriander powder and salt.
  • Add green chilly now. Fry till sweet corn becomes soft. This stuffing is spicy as loads of red pepper powder and green chilies is added, however if you are not too keen on handling such heat in your paratha then half the quantity of red pepper powder and green chilies, to be honest ,I prefer heat from the green chilies in parathas as they turn out very flavourful that way.
  • Now divide the atta dough in equal proportions. I end up making 5 parathas out of the dough.
  • Roll out small disc, place the sweet corn stuffing in middle and then seal the disc from all side working with your palms.
  • Dust some more flour over the rolling board. Now with the help of rolling pin, gently start making rounds.
  • Place it over hot tava/iron skillet, and then cook evenly from both sides. Add oil with a spoon from the sides and fry well. If you are generous in accepting fats in your diets, then fry it with desi ghee. Or place a teaspoon of butter at the time of serving.
  • Note-One thing which is necessary is that the Tava/iron skillet should be properly heated before hand; otherwise parathas don’t turn out crisp and cooked evenly. I have found cooking with electric hob is quite tricky as compared to gas cooking; it takes much time to cook on electric hob.
  • For variation I do like to add some grated carrots as stuffing also.
  • You can easily make them beforehand and pack them as picnic lunch or as a lunch while you eat and go or are traveling or may include them in your children's lunch box menus.Many ideas to explore for you.

Happy Cooking Friends