-->

Friday, January 27, 2012

Baby Spinach and Beet Lentil Soup


We have been trying many new soups these days. Our traditional Bengali moong masor’er dal got recently a new twist. I happened to have some beet and baby spinach, in pursue of introducing healthy vegetables in to our meals, I decided may be I should go ahead and try adding them in dals or lentils.


Now I am sure everybody has their own versions of these dal or lentil soup. The recipe below is my way of incorporating flavors together. I skip tempering the dal with onion, ginger and garlic, instead I do like to add them right with the lentils and pressure cooks it. It saves whole lot of effort and flavor wise tastes wonderful.


Now to the recipe

Baby Spinach and Beet Lentil Soup
Recipe requirements
  • 1 large bowl of baby spinach
  • 1 large beet with tender leaves if possible
  • ½ cup of massor dal/red lentils
  • ½ cup of dhuli moong dal/yellow lentil
  • 2-3 tbs of pearl barley
  •  1 medium size onion
  • ½ inch ginger
  • 2 garlic cloves
  • 2 medium size tomatoes
  • 1 tsp of salt
  • 2 tsp of crushed black pepper


Method
  • Chop and wash beetroots. Wash and clean baby spinach leaves well in water.
  • Now chop in garlic, ginger, onion and tomato roughly.
  • Clean and wash the lentil mixture of moong and masoor dal , couple of times in water.
  • In a pressure cooker, add enough water say about 3-4 cups . Add in lentil mixture, when a white froth appears, scoop out and discard that.
  • Now add in all the chopped vegetables- beet, tomato, onion, ginger and garlic and also pearl barley. I have added barley to give a little more filling touch otherwise it’s not necessary to add it. Do not add spinach now.
  • Now lock the pressure cooker and put it to cook. One whistle at high, lower the flame – 1-2 mints and then takes it off from the flame.


  • Open the lock once the pressure subsides. Add in baby spinach leaves. As spinach leaves are tender, it will get cook easily.
  • Now adjust the seasonings, add salt and also add freshly crushed black pepper. This imparts a great flavor.Or you may add cayenne pepper for some extra spice in the soup.
  • Let it cool a little bit, then pulse thro half of the soup mixture in a grinder/mixer, reserving the beet root pieces. Otherwise leave it and serve without making a puree whichever way you prefer. Personally I do feel making a puree adds some great color and texture to the soup, making it more creamy sans cream and thick.
  • At the time of serving, sprinkle some dried herbs over it. Even Kasoori methi can work great here as an alternative to Italian dried herb or oregano.


Sending this soup recipe to Priya's  Healthy Diet Event- Warm Soup at Priya's Easy N Tasty Recipes...............


                                                        **********************

These two pictures below were clicked by our DD, while we were roaming around in a park in Cambridge.


Aren't they gorgeous!! 

Well can’t believe entire week has gone and now it’s finally Friday.Enjoy your weekends friends...and 

Happy cooking friends.


Wednesday, January 25, 2012

Baby Spinach Mushroom and Barley Soup


Tomorrow India celebrates it's Republic day and to all the Indians living and spread across the globe and in homeland also.Wish all of you a very happy Republic Day..Even we are far away from our home..we always carry a small portion of it wherever we travel or live in abroad..

I have felt a sense of discomfort whenever we come across people back home..you know oh! you live in abroad so obviously you lack "prem for your matrobhomi"..why ?

 I have seen most insensitive people even living in India and having an unsympathetic feelings for their  own country....It's just so easy to criticize the present norm there..but if you can bring on changes and is capable of doing it then take proper interest in doing so..and changes always start from your own home..Don't they? ..Treat your own ladies and children in home well first ..society automatically will get molded for better later on....
But come on not all NRI's  are bad ...It's the fact ..take it or leave it ..up to you!! End of rant!!


Now to the Recipe


Another day and a new soup recipe for all of you.This time made the soup with baby spinach and mushrooms and of course pearl barley.This soup tends to fill you up and it's a great way to warm up your cold and rainy evenings which is what we have been seeing for the past few days or so.


Baby spinach mushroom and barley soup
Recipe requirements
  • 1 large bowl of baby spinach
  • 2-3 cups chopped mushrooms
  • 1 tomato chopped finely
  • ½ cup of barley
  • 5-6 penne pasta 
  • 2 garlic pods
  • half inch ginger 
  • 1 onion chopped
  • 1 tsp of salt
  • ½ tsp of cumin powder
  • 1 tsp of crushed black pepper


Method
  • Wash and chop tomato, mushroom, onion, tomato, garlic and ginger.
  • Now fill in 4-5 large cups of water in pressure cooker.You can use chicken broth or vegetable broth as wel.
  • Add in all the chopped vegetables except the baby spinach leaves.Add in barley and penne pasta.You may add some bread chunks in place of barley and penne pasta.Barley or penne pasta or bread chunks gives the thick and creamy look.A good alternative to cream or potato in soups making it even more healthy.
  • Adjust the seasoning with salt, black pepper powder, cumin powder.
  • Lock the lid and put on for one whistle.Lower the flame and let it cook for 4-5 mints.
  • Open the lid once the pressure subsides.
  • Take out and after cooling little bit , pulse half of the soup in a mixer.
  • Now transfer this soup mixture in to the soup pot and add the baby spinach leaves.
  • And let it simmer a little bit.This will make it smooth and thick making it even more filling.


Serve pipping hot with toasted bread or whatever way you prefer.


Sending this soup to Priya's  Healthy Diet Event- Warm Soup at Priya's Easy N Tasty Recipes...............

Happy Cooking Friends 

Monday, January 23, 2012

Pearl Barley Sweet corn and Carrot soup


How many times you can watch a movie? Two times .Three times. I ,we have been watching “Lion King” for 10 times now and each time we see it, we find something new and amazing about it.
We slowly have started liking, watching cartoon films (yeah that is how most of our weekend evenings are spent now).Credits goes to our adorable DD who insists on watching it with us.


But interesting thing to mention here is that each time we see it, there is always some hidden message. So, will go with what Timon and Pumbaa sings “Hakunamatata”…You will think we have gone nuts. But trust me “Hakunamatata” philosophy does help…so for the time being I am in that mood “problem free philosophy” even in cooking food. So, I do think soups needs less tension and time to be prepared but when it comes to nutrition and benefits they excel...don’t they...


This week it’s soup week here. Barley as you all know is a healthy alternative to rice or wheat. So, whenever I feel like having something different other than eating rice for lunch, most of the time I end up eating soups made with barley.
Sweet corn and carrots do add nice and healthy nutrients and some color also to this soup. And this is really will be great way to eat healthy after last week’s filo pastry indulgence.


Pearl Barley Sweet corn and Carrot soup
Recipe requirements
  • ½ cup of barley
  • 1 cup of sweet corn
  • 2 carrots
  • 8-10 penne pasta
  • 1 tomato
  • 2 garlic pods
  • ½ inch of ginger
  • 1 tsp of salt
  • 1 tsp of crushed black pepper

Method
  • Cut and chop vegetables roughly. Finely chop garlic and ginger.
  • In a pressure cooker add in 4-5 cups of water. You can use vegetable or chicken broth in place of plain water.
  • Now add in all the chopped vegetables- tomato, carrots, garlic and ginger. Adjust the seasonings with salt and crushed black pepper. Add in sweet corn.
  • Now add in washed barley and also penne pasta.
  • Lock the pressure cooker and let it have one whistle. Lower the flame and cook for 3-4 mints. Switch off, open when the pressure subsides.


Serve warm with some toasted bread.


Sending this soup to Priya's Healthy Diet Event- Warm Soup at Priya's Easy N Tasty Recipes...............


Happy Cooking Friends

Friday, January 20, 2012

Mince Pie Pinwheels - Vegetarian


This will be my last recipe with filo pastry for the moment. It’s been really great to know that a readymade filo pastry can be used to create many delicious recipes and it does look pretty as well.And also as far as the ingredients that goes in for manufacturing the filo pastry is concerned , this can be good as vegan food as well.
I have been eating the  mincemeat pies but boxed and store bought which I do get from M&S here .Of course its vegetarian though, as they use various assorted dried fruit mixture as meat replacement.


However when I was working with filo pastry , I searched on the internet about filo pastry and dried fruit mixture. I came across many recipes that look quite like pinwheels.So below recipe that got formulated at the end, is the adaptation of many recipes out there in net.

I have spiced it up with whatever ingredients I had in my pantry at the time of making them.So, a different flavor was quite evident.And also I had some left over dried fruit mixture even after I made Christmas Cake and Cous-cous and dried fruit stuffed chicken breast.


This was another great hit with my family.
Now to the recipe 

Dried Fruit Mincepie pinwheels
Recipe requirements
  • 1 packet Jus Roll  long puff pastry
  • ½  cup of caster sugar
  • pinch of red pepper powder
  • 2 tsp of cinnamon powder
  • 2 tsp of nutmeg powder
  • About 2 tsp of mixed spice powder
  • 1 cup of assorted dried fruit mixture


Method
  • Preheat oven at 180 Deg C.
  • Now sprinkle sugar and some flour over your working area.
  • Roll out the thawed puff pastry to more about 1-2 inch further long but still in rectangular shape. 
  • Now sprinkle nutmeg powder+cinnamon powder and some caster sugar evenly over the rolled pastry.
  • Use the rest of sugar to coat the dried fruit mixture very well. Add in mixed spice powder and red pepper powder.
  • Place the dried fruit mixture on one side of the pastry. If you wish you can finely chop the fruit mixture and then add it.
  • Now start folding the pastry so that it ends up being a long sausage sort of shape. Seal the other end with some milk or water.
  • Put this into refrigerator for about an hour.
  • Take out and again sprinkle some flour and sugar evenly over it.
  • Cut it into rounds of equal sizes of about 1 inch thick. You can make them little bit more fat of about 3 inch or even more thin.
  • Transfer them over the baking tray. Bake those 30 mints or till barely golden.
  • Take out and let it cool.
  • Serve hot or cold with cream or honey or whatever way you prefer.


Note-
  • You can add muscavado sugar in place of normal caster sugar to increase the shell life.
  • I have added red pepper powder to spice up little bit, but if you don’t like it then skip it.


Have a Nice weekend friends
Happy Cooking 

Wednesday, January 18, 2012

Petite Cinnamon Puff- Black and White Wednesday


When I was making these, elephant ears or palmier was on my mind. But I end up making small replica of palmiers as I used half of the puff sheet and also cut wise I have left the pieces little fat.Anyways the end result was gone in one day, thanks to a very picky eater who loves to gorge on these fast foods. She is my DD and has demanded another batch....


Kids I tell you are so unpredictable. What goes in their mind who knows? She even helped me, sprinkling cinnamon powder and caster sugar over the pastry. And also in melting chocolates in M/W.
More of a play thing for her than some serious stuff. We made these way back when DD had long winter holidays.
These are quick to make and a great way to engage your child if one has nothing to do any positive or creative work or some challenging brain sensitizing stuff.


Now to the recipe-


Petite Cinnamon Puffs
Recipe requirements
  • 1 package puff pastry
  • 3-4 tbs of cinnamon powder
  • 3-5 tbs of caster sugar
  • For the glaze
  • ½ cup of milk
  • 2 tbs of double cream
  • 3-4 tbs of icing sugar


Method
  • Line up a baking tray with grease proof paper.
  • Preheat oven at 175 deg C.
  • Cut the sheet into half.Roll out little bit to spread it out. Sprinkle generously cinnamon powder+caster sugar.
  • From one end start rolling the sheet towards middle. When you have reached to the middle, start working from the opposite end coming towards the middle of the sheet. The shape will look elephant ears.
  • Now you can refrigerate it for half an hour to firm up the shape. I didn’t this time.
  • Bake the petite puffs for 20 mints or just barely golden. Take out and let them cool a bit.
  • Now make the glaze
  • Mix in milk,cream and icing sugar very well.


  • Drizzle this over the cooled petite palmiers.If you wish you can drizzle chocolate as well.
  • I happen to put some chocolate shavings this time.
  • Serve as snacks or breakfast accompaniment what ever way you prefer.

Sending the picture below to Susan's Black and White Wednesday......... at The Well Seasoned Cook.


Happy Cooking Friends


Monday, January 16, 2012

Vanilla Cream and Chocolate Puff


This week I will be posting recipes with puff sheets or filo pastry. I have prepared quite a lot of recipes with this pastry during the long winter holidays.They have been patiently lying there in my drafts since then.
French Napoleons were on my mind when I was making these cream puffs .Napoleons not something to do with Napoleon Bonaparte, is a classic French dessert made with puff pastry.


Although I must say, I really think I need some more practice before I should claim them authentic Napoleons. So I would let it remain cream puffs as that is what my DD and DH told me while eating them.
Napoleon is made with many layers of creamed filled pastry and is also known as mille-feuilles. Sometimes fruit preserves are also used along with cream. I have left out the fruit preserve part and made only with cream and chocolate.

Now to the recipe

Vanilla Cream and Chocolate puffs
 Recipe requirements
  • 1 packet puff pastry
  • For the cream stuffing
  • ½ cup of double cream
  • ¼ cup of sugar
  • 5-6 tbs of thick custard
  • 1 tsp of vanilla extract
  • For the glazing
  • ½ cup of icing sugar
  • ½ tsp of vanilla extract
  • 3-4 tbs of milk or as desired to make glaze
  •  4-5 dark chocolate pieces or 3-4 tbs of melted dark chocolate


Method
  • Preheat oven at 175 deg C.
  • Line up a baking tray with greaseproof paper.
  • Now cut the pastry into half. I have used half pastry sheet for making the cream puffs.
  • Now cut half of the sheet into equal size squares approx of 1 inch wide.
  • Place them over the baking tray.
  • Bake them for 5 mints. Take them out and prick them with fork so that puffs don’t rise much.
  • Again transfer them in oven. Bake them for 15- 20 mints at 175 deg C or till they turn out barely golden. Transfer them over a cooling rack.
  • Meanwhile the puffs are baking in oven. Mix in milk and icing sugar properly for the glaze.
  • Prepare the instant cream filling
  • Mix in a bowl, double cream, caster sugar, vanilla essence and thick custard .You may use only vanilla custard in place of double cream. But cream does add a good texture. Beat till they turn out thick.
  • Now take the puffs, with gentle hand or with the help of tines of fork, try to separate them from the middle. Place generously the instant cream filling and place the other end over it.
  • Now prepare the glazing. Mix in milk and icing sugar and vanilla extract. If you think the glaze is thick add some more milk or if you think this has turn out thin.
  • Now glaze the evenly over the baked puffs by drizzling the mixture over the baked puffs.
  • Melt in an M/W safe bowl, dark chocolate pieces for 1 mint.
  • With the help of a small dessert spoon, drizzle chocolates over the glazed cream puffs. You can make marbled appearance if you wish to decorate more.
  • Keep them covered in refrigerator till all is set.


You are ready with chocolate cream puffs. Best if eaten within 2-3 days.
Serve and enjoy.

Note-
  • The amount of cream and glaze can be adjusted, we don’t like much cream and sweetness, so we use bare minimum of what is required.
  • In place of double cream, you can use only thick pudding or vanilla ambrosia custard as well.
Updated


Sending this post to Srivalli's Chocolate Mela.....

Happy Cooking Friends

Saturday, January 14, 2012

Poush Parbon 'er Recipes -Sankranti/Lohri Recipes


Here is a list of recipes for Sankranti/Lohri/Poush Parbon  that I had  prepared earlier . Just thought it would be nice to group together in single page.


Ranga aloor pantua


Sedho Puli


Shoro Chakhli - Mong dal dosa


Noton gurer Payesh- Semiya Payesh


Narkel Nadu


Darbesh


Pati-shapta


Payesh- Kheer


Lohri Recipes


Mungfali ki chikki


Till Ke Gajak


Poha ke kurmure ladoo


Granola Ladoo


To all my readers -

Wish you all a very happy Poush Parbon ,Makar Sankranti and Lohri.


Happy cooking friends

Thursday, January 12, 2012

Couscous and Dried Fruits Stuffed Roasted Chicken Breast


Usually we do like to eat chicken as Hassle Free Chicken curry  and / or Roasted Chicken ,  but sometimes just out of sheer eagerness and being experimental in nature, I try to explore new dimensions in fixing up chicken. Well, then comes this stuffed chicken breast recipe, which we prepared way back during one of the days of long winter holidays. I kept reminding myself that I have to post this recipe and must clear my drafts at least before New Year, but somehow it didn’t work out. 


Now with this, comes to an assumption about festive foods. I must add to that, I really don’t know if you think these recipes should always tag along during Christmas and New Year celebrations or for that matter any other celebrations. But to me whenever you feel like celebrating, I would say go ahead, who’s stopping you to celebrate as celebrations don’t need any reasons. It just what you feel in your heart when you do feel celebrating. Right?

And celebrations mean good food and in company of your loved and near ones even if it’s not a usual festive day or for that matter festive season.

Couscous  and Dried fruits stuffed Roasted Chicken Breast
Recipe requirements ( serves- 3-4 people)
  • 2 large chicken breast
  • For the seasoning of chicken breasts pieces
  • ½ tsp of salt+1 tsp of black pepper
  • For the stuffing
  • ½ cup of couscous
  • ½ cup of assorted mixture of dried fruits
  • 1/2 tsp of red pepper powder 
  • 1 tsp of cinnamon powder
  • Salt as per taste
  • 1 cup of water to cook couscous
  • For the sauce 
  • 3-4 tbs of butter
  • 3-4 tbs of cherry jam
  • 1 tsp of cinnamon powder
  • 1 tsp of nutmeg powder
  • And 3-4 tsp of dried herbs


Method
  • M/W a cup of water at high for 1 mint .Add red pepper powder and cinnamon powder in the cup and stir well .This gives a nice cinnamon flavor to the cooked couscous and also the required amount of spiciness.And then add in the couscous into it. Cover it and let it sit there about half an hour. Cous cous will tend to swell out absorbing the water. It will make double the amount of cous cous you have soaked in water.
  • Clean the chicken breast pieces in water and then pat them dry with kitchen towel.
  • Now cut into 3 equal pieces depending on the size and weight of chicken breast pieces. Now place one piece in greaseproof paper, roll over from the opposite corner of greaseproof paper covering  over the chicken breast piece.
  • Now gently start pounding/patting the chicken pieces, make sure the strokes are gentle otherwise the tender chicken breast meat will tear out. Tip- you can use rolling pin to gently pound the chicken pieces.
  • Sprinkle salt and black pepper. Keep aside.
  • Meanwhile prepare the sauce and put the oven to preheat, preheat oven at 175 deg C.
  • Soak about 6 toothpicks in water, this makes them soft, so easy to work with them.
  • Melt in butter and jam in a melting pot, adjust salt if required, then add cinnamon powder+nutmeg powder. Add in about a cup of water. This will make it thin. Cook it for 5-8 mints till all gets well mixed up.Make sure the sauce don't get burnt.


  • Now in a mixing bowl, Mix in assorted dried fruit mix + cooked couscous. Taste for salt. Now this mixture is sweet and savory both, as couscous lends the savory part and dried fruit mixture gives a sweet texture. How ever if you think you may skip any one and make savory filling or sweet filling as well.
  • Now place about 2 tsp of stuffing mixture on one side. Start rolling gently from that side, and when you have reached the other end with the help of toothpicks, seal the gaps and hook it well. You can alternately use thread for sealing the sides. Make other rolls similarly.
  • Place aluminum foil/greaseproof paper over a roasting tray. Line all the rolled and stuffed chicken breast neatly.
  • Sprinkle generously dried mixed herbs over each stuffed chicken breast.
  • Transfer them in the oven. Bake them for 10 mints at 175 deg C.Take them out, drizzle generously the jam butter sauce over it.
  • Transfer again to the oven and bake another 10 -15 mints at 175 deg C.Take out when done.Again drizzle the sauce generously.Reserve some sauce for serving with the stuffed chicken.
  • Serve and enjoy.


Note-
  • You can either make savory or sweet filling. You can use only cous cous for savory stuffing or the dried fruit mixture for the sweet filling. The recipe above is a mixture of savory and sweet filling which we liked a lot.
  • You can use cheddar cheese+ finely chopped mushroom for the stuffing as well. That is another way stuffed chicken breast can be made.
  • Another sauce which goes well with this recipe is cranberry sauce.Use fresh cranberries in place of cherry jam and while cooking up the sauce, add brown sugar or caster sugar to it.Cranberries are sour in taste so requires proper sweetness and texture which brown sugar tends to add.
Happy Cooking Friends

A Special Request


I have been getting a lot of comments from fellow food bloggers who are new to food blogging world with links to your food blogs and food events.
I have been blogging for the past 5 years with some decent page views a month. So, I know at the end of the day all we want is some readers whocan read our posts.

 I have created a page just under the header- Food Blog List , Food Events and More

This tab/ Sticky Post - is dedicated to thriving Indian food blog community. This will be a one stop point for me and perhaps many to find out what goes in food blogging world.

If you are interested to promote your webpage and food events, then drop me a comment in that post. I will be gladly updating the post with links to your WebPages and food events so that more people can read your blog and participate in your food blog events.

This is my way of appreciating your precious food blogs friends.

Happy Cooking and Blogging Friends

Wednesday, January 4, 2012

Baklava- New Year Sweet Treat


A new year, a new phase and in the back of my mind playing "Here I am "  sung by Bryan Adams.
And on a new start in a new year what could be more appropriate than a sweet post. And I don’t need much to say about Baklava. Well blame it all over, our indulgence in having sweets or desserts this holiday season or these tempting Baklava which we were eating like anything.
This holiday season I have put on weight.There, there it goes to drain, all my efforts of healthy eating and healthy lifestyles. But whatever be the reason, other than eating baklavas, do you think we food bloggers tend to put on weight faster than the normal jet speed is, as we have been blogging well about food or is it just me?


Scene 1- Somewhere in a suburbs office, at 8.45 a.m on a boring Monday morning. - So what is the first thing you see joining back to office/workplace after these relaxing holiday is over? You make notes of people around your cabin/cubicles.And what you take notes of? Well, how much weight one has put on. And again you feel elated when you see someone nagging about putting up more weight than you did this time. It well, makes you a winner in your own eyes. Well, see I am doing little better than you. Oh! That again calls for some more sweets. Now where is my snack box with sugary walnut Baklavas…?


Scene 2- Somewhere near a school at 3.30 p.m. on a tiring Tuesday afternoon - While picking up your kid from school on the very first day of school after these long festive holidays, what you realize? You realize that some of the playground gossipers have picked up clothes that were put on sale at bargain prices on the great Boxing Day. No it’s not the clothes which are the problems, it’s the weight again. Those clothes do not fit them now and they need to exchange or return it. Again that makes you a winner in your eyes. Again that calls for another piece of having those royal baklavas.Now where is my snack box with some Baklava pieces tucked inside neatly...Was it in the car or was it in my purse..?

Scene 3 – Look, there are hundred reasons to eat Baklava and I don’t need to add much on that.And even if I keep on eating another piece of Baklava, well world will not come to an end.And again coming next new year, we will be discussing about weight gain and its adverse effects on our lifestyle. It’s just like circle of life. As simple as that.


Baklava is traditionally a Turkish dessert or may be a Lebanese or may be an Armenian dessert or may be a Mediterranean Greek dessert or whatever.What matters is, you can make them in home and that too with the flavours you wish to add. I generally like to make these during festive times. Now I don’t think filo sheets is that much easily available back home. I don’t know about supermarkets there.If you know any place , do share the Information here.

 But here in abroad, you can easily get filo pastry/sheets from the frozen section of supermarkets. Usually a packet has 8-10 sheets which is what this recipe calls for. Take two packets to make double layer baklava.

These individual pieces, when brought from local café or cake outlets burns hole in the pockets. But if you can make them in home it’s much more economic and more importantly you know the stuff that goes inside it.

Now to the recipe

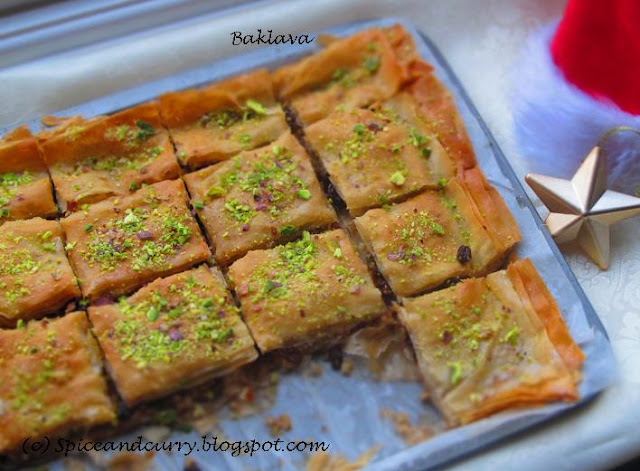
Baklava- a sweet treat 
Recipe Requirements - makes- 20 
  • 1 packet of frozen filo pastry
  • 3-4 cups of crushed walnuts and almonds
  • ½ cup of pistachios crushed very finely and some more for garnishing
  • ½ cup of melted butter
  • 2 tsp of cinnamon powder
  • 1 tbs of lemon juice and some lemon peels
  • 7-8 tbs of caster sugar+ some more to mix with dry fruits about 2-3 tbs 
  • ¾ cup of water

Method

  1. Thaw the frozen puff sheets/filo pastry  prior of making the baklava.
  2. Now crush toasted walnuts and almonds with rolling pin over a chopping board or in a mixer. Always prepare the dried fruits mixture first.
  3. Flavor it with cinnamon powder+ little bit of caster sugar
  4. Before you start making the baklava, it’s better to make ahead sugar syrup first. This time I almost forgot. Tip- I have to cool it over a pan, a larger pan than the pan/pot with sugar syrup with ice-cold water stirring it.Well, kind of a quick chill. Just crush some ice in water to get ice-cold water; anyhow the water here is almost freezing in the month of December.
  5. Ok, now after you have made the sugar syrup, taste it to check the sweetness. Add more sugar and let it cook a little more or till sugar dissolves completely.
  6. If you are big fan of rose essence in your Baklava, I would recommend using it in sugar syrup, otherwise skip it.
  7. While making the sugar syrup, add cinnamon powder, about a tbs of lemon juice and some lemon peels if possible and make a good stir. Let it cool a little bit.
  8. Now start assembling the baklava.Filo sheets tends to become dry quick. Cover it with a towel while working with it.
  9. Melt butter in M/W.Melt just required coating the base layer of baklava. Then another batch when you are coating the top layer. The layering depends on the kind of how much thick or thin baklava you want to make. Traditionally a 38 – 40 layer baklava is made. No, I don’t think I can make that much so ended up using a single packet which has only 8 -10 sheets perhaps. So my base layer has 4 sheets and then the top layer has 4 sheets, and dried fruits are tucked inside precisely.
  10. Place a grease proof paper over a 13* 9 inch baking tray. If you wish you may cut the sheets into half. I thought just as folding the excess part over the sheet was much easy and besides it is quick and don’t get tear .Even if the sheets gets teared, don’t fret the end result hardly shows any impact.
  11. Now keep on coating/brushing the filo sheets and then placing it over against the last one. After 4-5 sheets, spread the dried fruit+cinnamon powder+sugar mixture generously and evenly.
  12. Now start covering with other sheets. Top layer will have at least 3 or 4 sheets. If you want a double layer of dried fruits then use two packets of filo pastry/puff sheets instead of one.
  13. Brush the remaining filo sheets with melted butter. Cut into diagonals like pyramids or into square of about 1*1 inch.
  14. Preheat an oven for 4-5 mints at 175 deg C. Transfer the assembled baklava into oven and bake for 15-20 mints or till the sheets turn little golden.
  15. Take out the baklava and then slowly start pouring the sugar syrup over it.Tip- Please do not hurry while pouring sugar syrup. Drizzle over the sides and along the diagonal cuts slowly about a tsp at a time.
  16. Let it sit there for overnight for better flavors next day. And if you don’t want to wait then enjoy.


Note-

  1. If you are not a big fan of spices, then skip cinnamon powder in sugar syrup and just drizzle plain sugar syrup. Adding rose essence or rose water also enhances the flavor.
  2. The dried fruit mixture can be pistachios or walnuts or almonds making them different types of Baklava.
  3. As a garnishing you can sprinkle pistachio powder.Just my two cents on Baklava.

Happy Cooking Friends